What is In-App Purchase and what is its need?
In-App Purchase alludes to the purchasing of some extra highlights or administrations inside an application. Designers offer these extra types of assistance as a piece of a free application to adapt it.
It’s simpler to draw in clients towards a free application and afterwards give extra highlights to their convenience. For instance,
You can add promotions to your application and can charge clients to allow them to have an advertisement free encounter of the equivalent application.
You can likewise give an alternative to purchasing gems for additional utilization in a game.
Presently I’ll specify In-App Purchase as IAP in the further report.
Sorts of IAP :
There are not many kinds of IAPs, accessible which are advised beneath:
- Non-Consumable: An item which you purchase once and never terminates or diminishes with use are Non-Consumable Products. For instance, the skin of a character in a game.
- Consumable: These are the items which you purchase more than once and decline with use. For instance, an asset to overhaul certain stuff inside a game.
- Auto-Renewable Subscriptions: The item which you purchase once and gets overhauled consequently for a specific charge except if the clients select themself out of it. For instance, Netflix membership.
- Non-Renewing Subscription: Product which you purchase and exists for a specific timeframe. For instance, a pass to open additional highlights for a month.
Step by step instructions to add IAP to your application?
You don’t have to make a pristine application to add IAP, rather you can add IAP to the current application and again distribute it to the App Store. Yet, here we’ll take it from the earliest starting point for which you need to do some additional undertaking.
Step 1: Expecting you to now have an Apple account.
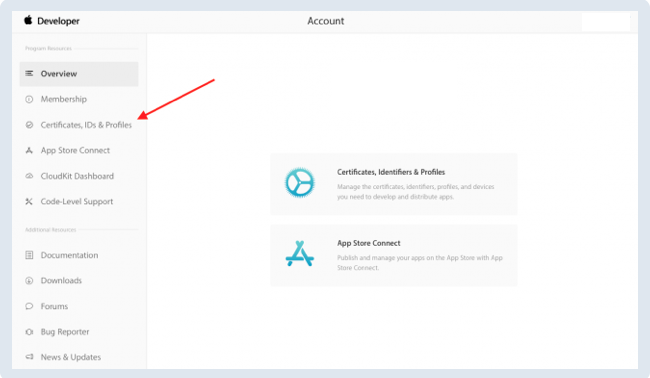
i. Make an App ID. Visit Apple Developer and SignIn to your record.
ii. Select Certificates, IDs & Profiles from the left menu.
iii. Select App IDs inside the Identifiers segment and snap + at the upper right corner.
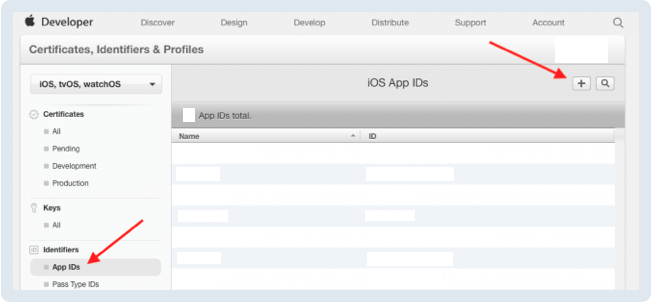
iv. App ID will be chosen naturally. Snap Continue.
v. The app will be chosen naturally. Snap Continue.
vi. Round out all the subtleties and you’ll see Game Center & In-App Purchase will be chosen naturally. Snap Continue at that point Register and Done. Your new App ID is made.
Step 2: Presently visit App Store Connect & make another application in My Apps.
Step 3: In the wake of making another application, in the left menu see the In-App Purchases segment and snap Manage.
Step 4: Presently to make another IAP Product, you need to click + at the privilege of the In-App Purchases. You’ll see the accompanying screen.
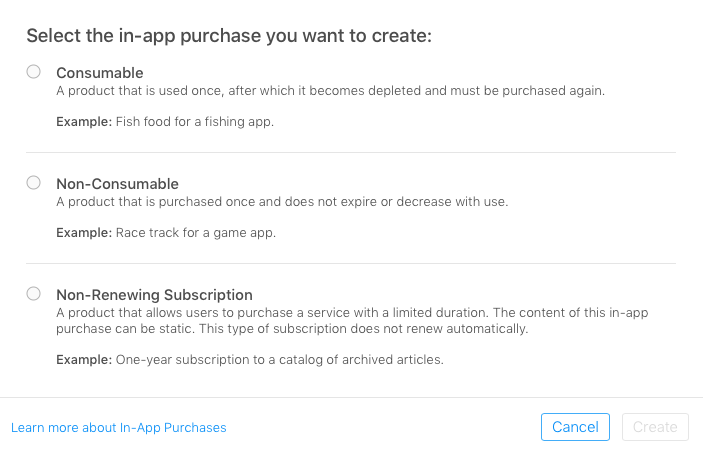
Select from these choices as indicated by your need, click Create. On the following screen, round out all the necessary subtleties like Reference Name, Product ID, Cleared for Sale and Price Tier as per your prerequisite. Arrangement for Product ID ought to resemble “com.organisation_name.project_name.iap_product_display_name”. Underneath the subtleties, you’ll discover the Localizations segment with Localizations section with English(U.S.) as the default locale. Add Display Name & Description same as the Reference Name, for default localization and snap Save. You can likewise add various areas here by tapping on the + button after Localizations.
Note: Ensure you have added a screen capture of the IAP at the lower part of a similar page. This screen capture might be utilized by Apple to audit IAP.
Step 5: To test the IPA, you need to make another Sandbox Tester. Go to the Home Screen of the App Store Connect & pick Users & Profiles. From this screen, you can add another Sandbox Tester by clicking + after Tester label. In the event that you as of now have an analyzer account, you can skirt this progression.
Note: For testing Non-Consumable IAP Products, you need to make another analyzer account again and again as it will continue reestablishing the buy, rather than regarding it as another buy.
Code to add IAP to a project:
Before straightforwardly leaping to the code area, open your venture in Xcode, pick your project in the Targets segment and then select Signing & Capabilities tab.
Look down and select In-App Purchase from the rundown of alternatives. It will add IAP ability to your task.
Add ‘New File’ to your project with a name, for instance, IAPProduct.swift and add following code to it:
// replace Display_Name with the string you added to Display Name & Product_ID with Product ID in App Store Account

import Foundation

enum IAPProduct: String {

   case Display_Name =  "Product_ID"

}

Add one more ‘New File’ with name IAPManager.swift and add the beneath code to this record:

import Foundation

import StoreKit

class IAPManager: NSObject {

    // MARK: - Custom Types

    enum IAPManagerError: Error {

        case noProductIDsFound

        case noProductsFound

        case paymentWasCancelled

        case productRequestFailed

    }

    // MARK: - Properties

    static let shared = IAPManager()

    var onReceiveProductsHandler: ((Result<[SKProduct], IAPManagerError>) -> Void)?

    var onBuyProductHandler: ((Result<Bool, Error>) -> Void)?

    var totalRestoredPurchases = 0

       // MARK: - Init

    private override init() {

        super.init()

    }

    // MARK: - General Methods

    func getProduct() -> [String]? {

         productStr = IAPPruduct.Display_Name.rawValue

        let product = [productStr]

        return product

    }

    func startObserving() {

        SKPaymentQueue.default().add(self)

    }

    func stopObserving() {

        SKPaymentQueue.default().remove(self)

    }

    // MARK: - Get IAP Products

    func getProducts(withHandler productsReceiveHandler: @escaping (_ result: Result<[SKProduct], IAPManagerError>) -> Void) {

        // Keep the handler (closure) that will be called when requesting for

        // products on the App Store are finished.

        onReceiveProductsHandler = productsReceiveHandler

        // Get the product identifiers.

        guard let productIDs = getProductIDs() else {

            productsReceiveHandler(.failure(.noProductIDsFound))

            return

        }

        // Initialize a product request.

        let request = SKProductsRequest(productIdentifiers: Set(productIDs))

        // Set self as its delegate.

        request.delegate = self

        // Make the request.

        request.start()

    }

    // MARK: - Purchase Products

    func buy(product: SKProduct, withHandler handler: @escaping ((_ result: Result<Bool, Error>) -> Void)) {

        let payment = SKPayment(product: product)

        SKPaymentQueue.default().add(payment)

        // Keep the completion handler.

        onBuyProductHandler = handler

    }

    func restorePurchases(withHandler handler: @escaping ((_ result: Result<Bool, Error>) -> Void)) {

        onBuyProductHandler = handler

        totalRestoredPurchases = 0

        SKPaymentQueue.default().restoreCompletedTransactions()

    }

}

// MARK: - SKPaymentTransactionObserver

extension IAPManager: SKPaymentTransactionObserver {

    func paymentQueue(_ queue: SKPaymentQueue, updatedTransactions transactions: [SKPaymentTransaction]) {

        transactions.forEach { (transaction) in

            switch transaction.transactionState {

            case .purchased:

                onBuyProductHandler?(.success(true))

                SKPaymentQueue.default().finishTransaction(transaction)

            case .restored:

                totalRestoredPurchases += 1

                SKPaymentQueue.default().finishTransaction(transaction)

            case .failed:

                if let error = transaction.error as? SKError {

                    if error.code != .paymentCancelled {

                        onBuyProductHandler?(.failure(error))

                    } else {

                        onBuyProductHandler?(.failure(IAPManagerError.paymentWasCancelled))

                    }

                    print("IAP Error:", error.localizedDescription)

                }

                SKPaymentQueue.default().finishTransaction(transaction)

            case .deferred, .purchasing: break

            @unknown default: break

            }

        }

    }

    func paymentQueueRestoreCompletedTransactionsFinished(_ queue: SKPaymentQueue) {

        if totalRestoredPurchases != 0 {

            onBuyProductHandler?(.success(true))

        } else {

            print("IAP: No purchases to restore!")

            onBuyProductHandler?(.success(false))

        }

    }

    func paymentQueue(_ queue: SKPaymentQueue, restoreCompletedTransactionsFailedWithError error: Error) {

        if let error = error as? SKError {

            if error.code != .paymentCancelled {

                print("IAP Restore Error:", error.localizedDescription)

                onBuyProductHandler?(.failure(error))

            } else {

                onBuyProductHandler?(.failure(IAPManagerError.paymentWasCancelled))

            }

        }

    }

}

// MARK: - SKProductsRequestDelegate

extension IAPManager: SKProductsRequestDelegate {

    func productsRequest(_ request: SKProductsRequest, didReceive response: SKProductsResponse) {

        // Get the available products contained in the response.

        let products = response.products

        // Check if there are any products available.

        if products.count > 0 {

            // Call the following handler passing the received products.

            onReceiveProductsHandler?(.success(products))

        } else {

            // No products were found.

            onReceiveProductsHandler?(.failure(.noProductsFound))

        }

    }

    func request(_ request: SKRequest, didFailWithError error: Error) {

        onReceiveProductsHandler?(.failure(.productRequestFailed))

    }

    func requestDidFinish(_ request: SKRequest) {

        // Implement this method OPTIONALLY and add any custom logic

        // you want to apply when a product request is finished.

    }

}

// MARK: - IAPManagerError Localized Error Descriptions

extension IAPManager.IAPManagerError: LocalizedError {

    var errorDescription: String? {

        switch self {

        case .noProductIDsFound: return "No In-App Purchase product identifiers were found."

        case .noProductsFound: return "No In-App Purchases were found."

        case .productRequestFailed: return "Unable to fetch available In-App Purchase products at the moment."

        case .paymentWasCancelled: return "In-App Purchase process was cancelled."

        }

    }

}
Use the below code wherever needed in the ViewController class to request & get IAP products from the App Store.
func viewDidSetup() {

    IAPManager.shared.getProducts { (result) in

            switch result {

            case .success(let products): //save products to a variable or to your model’s property, both of [SKProduct] type

            case .failure(let error): // display error here

            }

    }

}
After adding the above method open AppDelegate.swift and call startObserving() method of IAPManager in the application(_:didFinishLaunchingWithOptions:) method like this IAPManger.shared.startObserving() before returning true.
Next add IAPManager.shared.stopObserving() in the applicationWillTerminate(_:) method of the AppDelegate.swift to stop observing.
You’ve implemented all the required methods related to IAP.
Now, we are going to add a custom function named purchase(product: SKProduct) to purchase the available IAP product. Below is the function which we need to call in our IBAction or on the click of a cell in UITableView or UICollectionView.
// pass the [SKProduct] type value as an argument to this function which we get from the above defined function viewDidSetup()

func purchase(product: SKProduct) -> Bool {

        IAPManager.shared.buy(product: product) { (result) in

                switch result {

                case .success(_): //update UI or something according to your need after a successful purchase

                case .failure(let error): // display error here

                }

        }

}
Also, done! You would now be able to test the IAP through the Sandbox Tester account in your actual gadget using these steps :
- Open device settings.
- Discover iTunes and App Store from the accessible choices.
- Begin looking to the base and there you’ll discover the Sandbox Account area. Snap SignIn and give the analyzer account credentials.
Note: You don’t have to give your genuine Apple account credentials here.
With Xcode 12 you can test In-App Purchases with simulator utilizing the accompanying advances :
- Make another configuration file. Open File -> New -> File in Xcode and pick StoreKit Configuration File in the Other area.
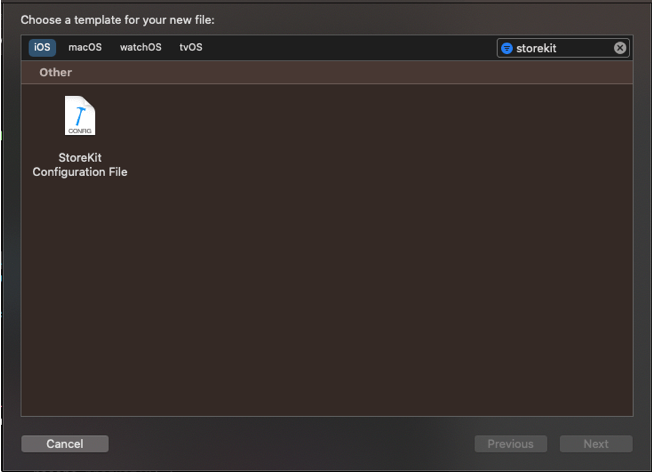
Snap Next. The document will show up in the project navigator window.
- At the left-bottom, you’ll discover a + button.

You can add three sorts of IAP items through this alternative which are :
- Auto-Renewable Subscription
- Consumable IAP
- Non-Consumable IAP
Note: You need to create separate configuration files to test diverse IAP items and ensure that just each, in turn, is chosen while testing.
- Then, fill Reference Name, Product ID (same as this “com.organisation_name.project_name.iap_product_display_name” ) and Price. At that point go to the Localizations segment and enter Display Name and Description as we did in the App Store Connect record and press Cmd+S. You can likewise eliminate the IAP things from the configuration file by picking the item and choosing ‘–‘ at bottom-left.
- Presently go to the Xcode toolbar and pick your project scheme and select Edit Scheme. There you’ll discover a choice by name StoreKit Configuration, select it and pick one from the rundown of setup records shown in the dropdown, as indicated by your need.
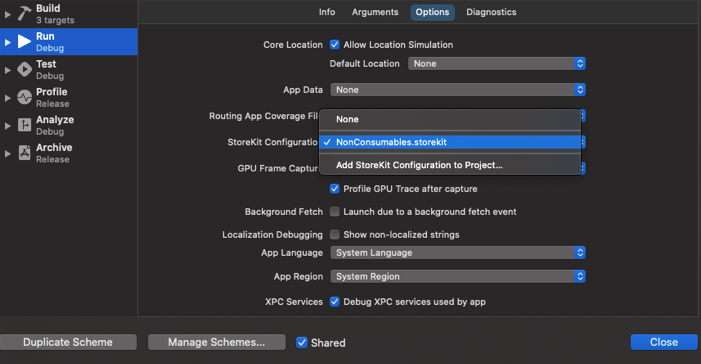
Close the scheme editor.
- Presently run your application and test your IAP usage.
Restoring In-App Purchases:
On the off chance that the buy is non-consumable and the client again attempts to buy that thing, StoreKit and payment queue when discovered any data like the client has bought the thing then the new buy measure gets considered as a reestablished buy so the client won’t be charged once more. To actualize this usefulness, you need to add the underneath code to your IBAction for reestablishing buys.
func restorePurchases() {

    IAPManager.shared.restorePurchases { (result) in

            switch result {

            case .success(let success): // do something with UI or functionality

            case .failure(let error): //display error here

            }

    }

}