
In this blog. I will explain how we can use deep linking in react-native. Nowadays we can use deep linking in many regular applications like Flipkart, Amazon, etc.
First, we will discuss what is actually deep linking? Deep-link is a technique in which a given URL or resource is used to open a specific page in the application.
For example, suppose you have a profile page and you give the link on the web or any other application for your profile page when the user clicks on the link there is not only open the application this link also navigate the screen to the profile page.
Image refers to the https://medium.com/react-native-training/deep-linking-your-react-native-app-d87c39a1ad5e
Linking will provide us with an API that will allow us to listen for an incoming linked URL, and then we can navigate to the page with the help of this URL.
Let see how we configure deep linking in a react-native application?
- To start, first, we create a react-native project.
react-native init deepLinkingDemo

Cd deeplinkigDemo
- Once the project is created navigate to the project directory and then install all dependency of the react-navigation.
npm install @react-navigation/native

npm install react-native-reanimated react-native-gesture-handler react-native-screens react-native-safe-area-context @react-native-community/masked-view
- For the ios device, we have to run some commands:
cd ios

Pod install
- Now we have to create a router and two view page.
i. Router.js
ii. Home.js
iii. Profile.js
- Now, import the Router.js file in the app.js
import React,{useEffect} from 'react';

import { createAppContainer } from 'react-navigation';

import router from './Router’;

const AppContainer = createAppContainer(rootNavigator);

const App = (props) => {

   return (

       <AppContainer

         ref={navigatorRef => {

         NavigationServices.setTopLevelNavigator(navigatorRef);

         }}

       />

   );

}

export default App;
- Now we have to create the router.js
/**  router.js **/

import React from 'react';

import {

 AppRegistry,

 Text,

} from 'react-native';

import { StackNavigator } from 'react-navigation';

import Home from './home';

import Profile from './profile;

const Router = StackNavigator({

 Home: { screen: Home },

 Profile: { screen: Profile },

});

export default Router;
- We will go ahead and create the Home.js
/** Home.js */

import React from 'react';

Import {Plateform, Text, Linking} from ‘react-native’;

class Home extends React.Component {

 static navigationOptions = {

   title: 'Home',

 };

componentDidMount() {

 if (Platform.OS === 'android') {

   Linking.getInitialURL().then(url => {

     this.navigate(url);

   });

 } else {

     Linking.addEventListener('url', this.handleOpenURL);

   }

 }

  componentWillUnmount() {

   Linking.removeEventListener('url', this.handleOpenURL);

 }

 handleOpenURL = (event) => {

   this.navigate(event.url);

 }

 navigate = (url) => {

   const { navigate } = this.props.navigation;

   const route = url.replace(/.*?:\/\//g, '');

   const id = route.match(/\/([^\/]+)\/?$/)[1];

   const routeName = route.split('/')[0];

    if (routeName === 'Profile') {

     navigate('Profile', { id, name: 'Mohan' })

   };

 }

 render() {

   return <Text>Hello there</Text>;

 }

}

export default Home;
- Now to create the JSON file for data.
export default  people = {

 0: {

   name: 'Leela',

   image: 'http://vignette1.wikia.nocookie.net/en.futurama/images/d/d4/Turanga_Leela.png/revision/latest?cb=20150218013044',

 },

 1: {

   name: 'Bender',

   image: 'https://vignette2.wikia.nocookie.net/en.futurama/images/4/43/Bender.png/revision/latest?cb=20150206072725',

 },

 2: {

   name: 'Amy',

   image: 'https://i.ytimg.com/vi/4sCtTq7K3yI/hqdefault.jpg',

 },

 3: {

   name: 'Fry',

   image: 'http://www.supergrove.com/wp-content/uploads/2017/03/fry-futurama-22-which-robot-from-quotfuturamaquot-are-you.jpg',

 }

}
- Now we go on the Profile.js
import React from 'react';

import { Text, Image, View, StyleSheet } from 'react-native';

import people from './people';

class Profile extends React.Component {

 static navigationOptions = {

   title: 'People',

 };

 render() {

   const { id } = this.props.navigation.state.params;

   if (!people[id]) return <Text>no user found</Text>

return ( // C

     <View>

       <Text style={styles.text}>{people[id].name}</Text>

       <Image

         resizeMode="contain"

         style={styles.image}

         source={{ uri: people[id].image }}

       />

     </View>

   )

 }

}

const styles = StyleSheet.create({

 text: {

   margin: 19,

   fontSize: 22,

 },

 image: {

   width: 400,

   height: 400,

 },

});

export default Profile;
Ok, our basic code setup is completed. Now we have to configure the native things in Xcode for iOS and in Android studio for android. Ok, let’s see the configuration.
iOS Configuration
Step 1: Add URL type to info.plist
i. Open info.plist and create the new property called URL types.
ii. Choose URL schemes.
iii. Give item 0 the name you would like your app to be linkable as. In our case, I choose peopleapp as the name.

Step 2: Add the following lines in AppDelegate.m
i. Add this line at the end of imports
#import <React/RCTLinkingManager.h>
ii. Add this code below @implementation AppDelegate
- (BOOL)application:(UIApplication *)application openURL:(NSURL *)url

 sourceApplication:(NSString *)sourceApplication annotation:(id)annotation

{

 return [RCTLinkingManager application:application openURL:url

                     sourceApplication:sourceApplication annotation:annotation];

}

- (BOOL)application:(UIApplication *)application continueUserActivity:(NSUserActivity *)userActivity

restorationHandler:(void (^)(NSArray * _Nullable))restorationHandler

{

return [RCTLinkingManager application:application

                 continueUserActivity:userActivity

                   restorationHandler:restorationHandler];

}
Ok, nice we have to do all the things for ios now for testing we have to pass the below line the URL in chrome and safari:-
peopleapp://people/0
And the app should redirect to the profile screen and the person’s info.
Android Configuration
First, we have to open the AndroidManifest.xml file and the following intent filter below the last intent filter within the <activity> tag:
<intent-filter android:label="filter_react_native">

 <action android:name="android.intent.action.VIEW" />

 <category android:name="android.intent.category.DEFAULT" />

 <category android:name="android.intent.category.BROWSABLE" />

 <data android:scheme="peopleapp" android:host="people" /> // A

</intent-filter>
After doing all these things, we have to open the android studio and do some configuration.
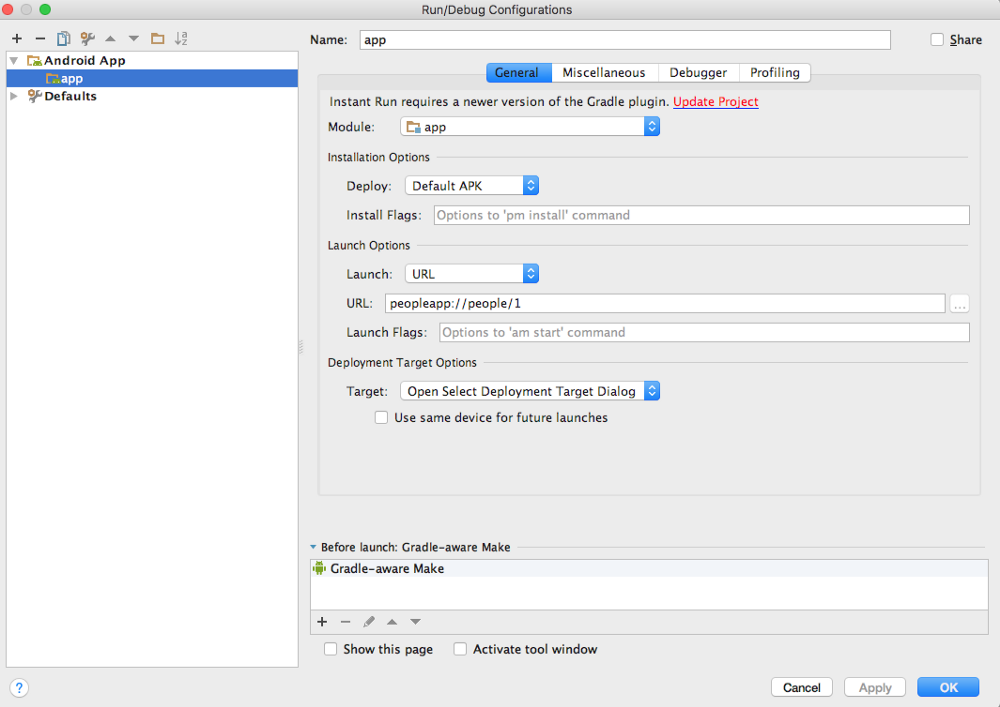
Open Android Studio -> Run -> Edit Configurations and change the launch options to URL, passing in the following URL: peopleapp://people/1
Now we have to run this app and we achieve Deep Linking in our application.