In the ever-evolving landscape of software development, Google’s Dialogflow is a powerful tool that enables developers to build conversational interfaces form applications, and integrating it with a Spring Boot backend can provide a seamless and efficient user experience.
In this guide, we will explore the steps to integrate Dialogflow into a Spring Boot application, empowering developers to create intelligent and user-friendly conversational applications.
1. Understanding Dialogflow
Dialogflow is a natural language processing platform by Google, facilitating the creation of conversational interfaces. It interprets user input in various formats, allowing developers to build interactive applications, chatbots, and more.
2. Setting Up a Dialogflow Agent
Before integrating Dialogflow into a Spring Boot application, you need to set up a Dialogflow agent. Follow these steps:
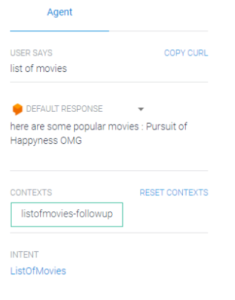
Step 1: Agent
An agent is a virtual conversational assistant that processes user input, identifies intents and entities, and generates appropriate responses.
Create a new Dialogflow agent. Call it whatever you want. My Agent’s name is “MovieBot”.
Step 2: Intents
Intents represent the user's intentions. Let’s say, I want to create a MovieBot so in that case my intent could be “ListOfMovies” or “Show Ratings Of a Movie” and so on.
NOTE :
a) You can enable Auto-Spell Check by exploring the Agent’s Setting ->> ML Settings. However, this spell-check checks for mis-spells allied to a particular Intent only.
E.g. : If my intent is “ListOfMovies” then it will check mis-spells for movies or list or something related to “ListOfMovies”. It won’t cover every mis- spells and to overcome that, Your back-end will help you by implementing additional logics.
b) There are two pre-defined Intents :
1. Default Welcome Intent : If you say hi/hello/greetings etc, Dialogflow handles it internally and gives you default response.
2. Default Fallback Intent : If user says something which Dialogflow is unable to understand, it will return Fallback.
These intents have their pre-defined phrases and responses which is very helpful and Dialogflow does it all on its own.
Step 3: Training Phrases
Dialogflow gives you the ease by adding Training Phrases. If you add “list of movies” as a training phrase then it will use its intelligence and answer questions such as “Could you please give me the list of movies”
OR
“Show me the list of movies”, you don’t separately need to enter these phrases. That’s the Intelligence of Dialogflow.
When you update your Training Phrases in Dialogflow, and save it, the Agent will train itself, and after completion of Agent’s training, at the bottom-right, it will notify by “Agent training completed”.
Step 4: Entities
Entities are used to extract important information from user input. Define these to train your agent to provide more accurate and context-aware responses.
Ex : For Intent named “ListOfMovies”,
a) User says “I want two movies”. Now, you’re defining no. of movies that you want so this “NUMBER” which is Two here will be treated as an entity.
But, Hey! Dialogflow here also gives you comfort i.e. you don’t need to create an entity for this Number. It provides you that under System Entity : @ sys.number.
Similarly, there are various types of pre-defined entities that Dialogflow have(System entity, RegExp Entity etc).
b) User says “I want action movies”. Now, you’re defining the genre of movie according to your choice so this “GENRE” which is Action here will be treated as a Custom Entity.
But this will not be under pre-defined entities thus, in this case, a Custom Entity will be needed. So, create Entity named “GenreOfMovies under “ListOfMovies” intent.
In this way, pre-defined entities and custom ones work but there’s more that you can explore!!
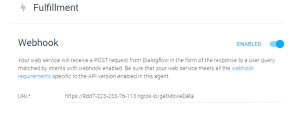
Step 5: Fulfillments
a) Now, the most awesome part of Dialogflow! ‘THE WEBHOOKS’ In the Fulfillment section for every agent, Dialogflow lets us provide a webhook, which is basically just a REST API that expects a parameter of a valid WebhookRequest object (JSON Format).
b) If an input matches any Intent and webhook is enabled for that Intent, Dialogflow is going to call that provided API with the WebhookRequest object as payload.
Step 6: Training Responses
a) Add some responses in the Responses section for the intent. Because if we enable webhook for an Intent, it’s the webhook’s responsibility to send back the response text, as the reply for the input.
b) In case the webhook fails, the provided text in Responses section will be the fallback.
3. Setting Up a Spring Boot Application
Now that you have a Dialogflow agent set up, let's integrate it into a Spring Boot
application.
Step 1: Create a Spring Boot Project
Use your preferred IDE or the Spring Initializer (https://start.spring.io/) to create a new Spring Boot project with the necessary basic dependencies.
Step 2: Add Dialogflow Dependencies
<!--
https://mvnrepository.com/artifact/com.google.apis/google-api-services-dialogflow -->
<dependency>
<groupId>com.google.apis</groupId>
<artifactId>google-api-services-dialogflow</artifactId>
<version>v3-rev20231011-2.0.0</version>
dependency>
<!--
https://mvnrepository.com/artifact/com.google.cloud/google-cloud-dialogflow
<dependency>
<groupId>com.google.cloud</groupId>
<artifactId>google-cloud-dialogflow</artifactId>
<version>2.2.0</version>
</dependency>
-->
Step 3: Configure Dialogflow Credentials
Create a Configuration file in your IDE provided with @ConfigurationProperties. To use this file, add dialogflow configurations in application.properties so that it can be used later (I’m creating MovieBot therefore, names are in its accordance, you’re free to use any).
# Dialogflow endpoint path
dialogflow.endpoint-/dialogflow-webhook
#Dialogflow configurations
moviebotconfiguration.google.name=MovieBot
moviebotconfiguration.google.projectid= concurrency-yo9g
moviebotconfiguration.google.languageCode: en
package com.dialogflow.moviebot.config;
import org.springframework.boot.context.properties.ConfigurationProperties;
@Configuration
@EnableConfigurationProperties
@Configuration Properties (prefix = "moviebotconfiguration.google")
public class MovieBotConfiguration {
private String name;
private String projectid;
private String languageCode;
Step 4: Create Controller, Service & Repository Classes Respectively
Create Controller, Service and Repository classes respectively using given demo references and add needed logic implementations according to your requirements.
@RestController
public class MovieController {
private static final Logger Logger = LoggerFactory.getLogger(MovieController.class);
@Autowired
private MovieBotConfiguration movieBotConfiguration;
@Autowired
private MovieService movieService;
@PostMapping("/getMovieData")
public WebHookResponse handleWebHook (@RequestBody WebHookRequest webHookRequest) throws Exception {
String projectId
movie BotConfiguration.getProjectid();
String languageCode = movieBotConfiguration.getLanguageCode();
movieService.getFulfillmentTextRequest(webHookRequest);
final String queryText = movieService.getQueryText(webHookRequest); String sessionId movieService.getSessionId (webHookRequest);
String displayName=movieService.getDisplayName (webHookRequest);
// CASE1: check the intent.displayName with "listOfMovies"
if ("ListOfMovies".equals(displayName)) {
}
return movieService.handleListOfMovies Intent(queryText, sessionId);
@Service
public class MovieService {
@Autowired
private MovieRepository movieRepo;
WebHookResponse webHookResponse = new WebHookResponse();
String fulfillmentTextRequest;
String session;
public String getMovieData() {
String movies = "";
List<Movies> unfilteredMovies = movieRepo.findAll();
for (Movies movie : unfilteredMovies) {
movies movies
movie.getMovieName() +
return movies;
}
}
public String getQueryText (WebHookRequest webHookRequest) { return webhookRequest.getQueryResult().getQueryText();
}
@Repository
public interface MovieRepository extends JpaRepository<Movies, Long>{
}
Step 5: Add-ons in Project
There are pre-defined classes for Intents, QueryText, QueryInputs etc. for developers use to connect dialogflow and SpringBoot however its upto you whether you want to use them or create your own user-defined models. I’ve chosen the second one. You can choose any.
4. Create Public URL for your Project
The SpringBoot application that you’ve created must be local, right. But, Dialogflow needs Public Secured URL (HTTPS only) to connect with your application. I’ve used NGROK to convert my Local URL to Public URL however it is valid for 2 hours only.
NGROK : Ngrok is a tunneling service that exposes local servers to the internet,
providing a public URL for testing and debugging web applications.
1. Download → Create your Account → Login → Go to Settings → Copy your Auth-Token
2. Open Command Prompt → Paste Auth-Token , then write the following :
“ngrok.exe http 8082” Eg : My server.port is 8082, use your port in place of
8082. And, this will give you Public URL using your Local URL.
Adding the public URL with your post-mapping endpoint will completely connect your application with Dialogflow (My end-point is “getMovieData”). Then, Save it.
And with that, Integrating Dialogflow into a Spring Boot Application has been done !!
LET’S CHECK WHETHER INTEGRATION IS SUCCESSFUL OR NOT –
As you can see, in FulfillmentText (“here are some popular movies”) of Fulfillment Request, there are NO Movie Names i.e. it shows only Training Response from Dialogflow.
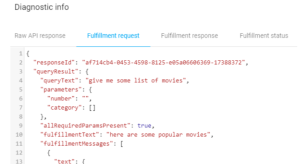
IMPORTANT – Fulfillment Response will be shown only if Dialogflow is connected to SpringBoot Application (backend).
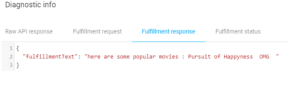
Now in the FulfillmentText of Fulfillment Response…
Training Response (“here are some popular movies”) from Dialogflow and Response from Back-end (SpringBoot) “: Pursuit of Happyness, OMG” are concatenated together (in the code itself) and giving us our desired response using Dialogflow & SpringBoot Integration.
NOTE :
a) I’ve taken two movie names here for demo purpose only however it is not the best practice in Real-World Scenario Projects.
b) In the movie name mentioned above, It is Happyness in Pursuit Of Happyness, not Happiness.
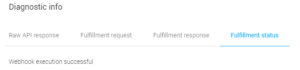
IMPORTANT :
The Fulfillment Status proves that Integration has been done successfully.
Here’s the Demo of Integrating Dialogflow into a SpringBoot Application :