
It is a new feature of React Js introduced in version16. This concept is used for handling UI errors which we face. Before version 16 there is no concept to handle this type of issue, we use try… catch… for handling.
When an error occurs in our app our complete app will crash and our browser shows a white blank screen. Error boundary is part of the React lifecycle method and will be used to catch errors and generate meaningful information to users. We can use it as an error reporting service for our app.
How error boundaries work in the react lifecycle?
In React JS , We can make a class component treat like a error boundary by using two methods
static getDerivedStateFromError() or componentDidCatch() . We can also use both together
For creating error boundary in React Component
static getDerivedStateFromError() :- It is used for handling UI error after the error has been thrown.
- componentDidCatch() :- It is used for rendering error information
We can use only componentDidCatch() to handle UI error and create error reporting for our app.
Implementing error boundary in react : –
- Create a new project with below command,
=> npx create-react-app errorboundry-demo
2. Create file Home.js in src with below code
import React from 'react';
import Test from './Test';

class Home extends React.Component {

    state={
        hasError:false,
        error:null,
        errorInfo:null
    }

    static getDerivedStateFromError() {
        return { hasError: true }
    }

    componentDidCatch(error, info) {
         this.setState({ error: error, errorInfo:info})
     }


    render() {
        if(this.state.hasError) {
            return <div>Sorry,Something went wrong!</div>
          }
          return(
              <div>
                <Test {...this.props} />
              </div>
          )

    }
}

export default Home;
3. Create Test.js file in src folder with below code
import React from 'react';

const Test = props => {
    return(
        <div>{props.name.toString()}</div>
    )
}

export default Test
4. Import Test.js in Home.js
5. Import Home.js in app.js with below code
import React from 'react';
import Home from './Home';

function App() {
  return (
    <div className="App">
      <h1 style={{color: 'red'}}>Showing Error Info</h1>
      <Home />
    </div>
  );
}

export default App;
6. Go to the terminal and start the project with npm start, after the project starts we will get

Projects created with create-react-app have built-in error reporting, when we are in development mode error reporting and error boundaries both appear in runtime. But in production, it only shows error boundaries in case of any error. When we create projects using create-react-app command it overlaps the error boundary by its own error reporting layout.
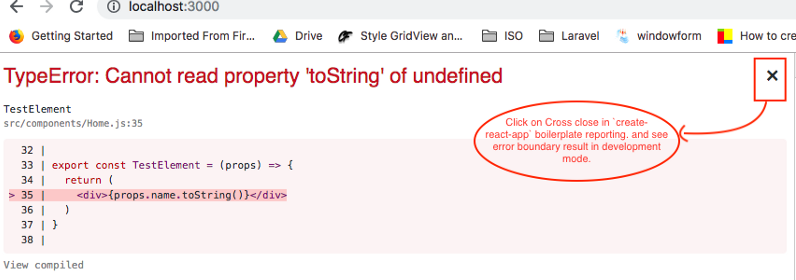
To see the actual error we have to close the create-react-app default reporting layout as shown below

If we create a project without using create-react-app or any boilerplate without any error reporting tool we will get above output directly by running the project.
If we want to see only error boundary in projects created using create-react-app we need to create production build which will automatically remove error reporting layout and shows only error boundary
You can also read our below blog on React:
Thanks for giving your valuable time. Keep reading and keep learning