
Introduction
I am going to introduce FCM (Firebase Cloud Messaging) implementation in Android app as well as in server side. FCM is a new, improved version of the Google Cloud Messaging (GCM). It has all the features of GCM as well as some additional features.
Android side Implementation (Part 1 – Registration of app)
1 . Add Firebase to your Android project
- Add the Android project to Firebase console. If you already have existing Google project associated with your mobile app, click Import Google Project else Create New Project.
- Click Add Firebase to your Android app and follow the setup process.
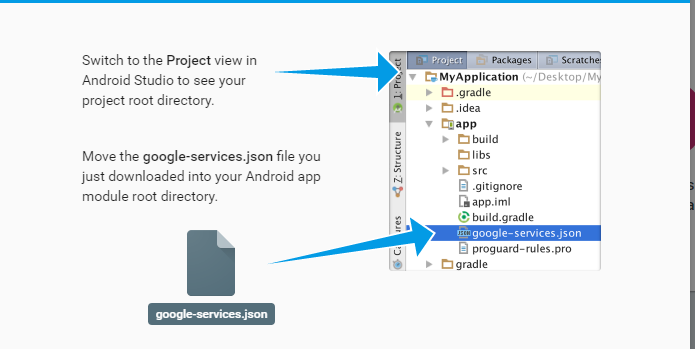
- At the end, you will download google-services.json file. You can download this file again at any time.
- Move the google_services.json file you just downloaded into your Android app module root directory.
2. Add Firebase SDK in Android Project in Android Studio
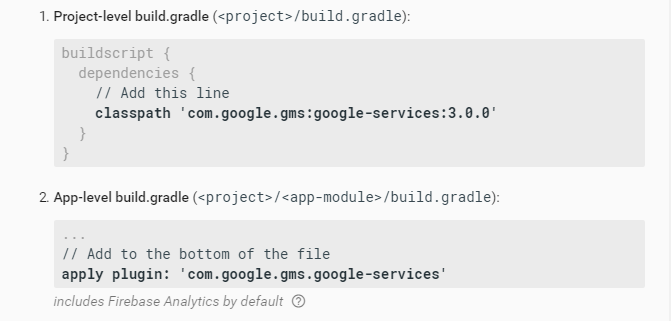
- Add rules to your root – level build.gradle file to include the google – services plugins.
- Then, in your app-level gradle file (app/build.gradle), add apply plugin line at the bottom of the file to enable the Gradle plugin:
In Android Studio, add the FCM dependency to your app-level build.gradle file:
dependencies
{
  compile fileTree(dir: 'libs', include: ['*.jar'])
  testCompile 'junit:junit:4.12'
  compile 'com.android.support:appcompat-v7:24.2.0'
  compile  ‘com.google.firebase:firebase-messaging:10.0.1’
}
3 . Android code setup for device registration
- Create a service that extends FirebaseInstanceIdService to handle the creation, rotation, and updating of registration tokens. This is required for sending to specific devices or for creating device groups.
- Add service declaration in app Manifest file.
<service
 android:name=".MyFirebaseInstanceIDService">
  <intent-filter>
       <action android:name="com.google.firebase.INSTANCE_ID_EVENT"/>
  </intent-filter>
</service>
Get the device registration token
- If the device doesn’t have a compatible version of Google Play services, your app can call GoogleApiAvailability.makeGooglePlayServicesAvailable() to allow users to download Google Play services from the Play Store.
- onTokenRefresh() callback fires whenever a new token is generated. On calling getToken() of FirebaseInstanceId you will get a currently available registration token. You can send this to your server.
@Override
public void onTokenRefresh()
{

  // Get updated InstanceID token.

    String refreshedToken = FirebaseInstanceId.getInstance().getToken();
    Log.w(TAG, "Refreshed token: " + refreshedToken);

  // If you want to send messages to this application instance or
  // Instance ID token to your app server.

   sendRegistrationToServer(refreshedToken);
  }
Server side Implementation
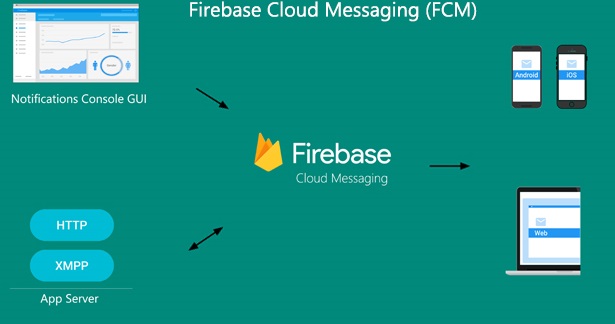
Infrastructure and Flow of Messages
There are 2 Entities involved here – FCM Server and Application Server
FCM Server
FCM connection servers are provided by Google. These servers take messages from an app server and send them to a client app running on a device. Google provides connection servers for HTTP and XMPP.
Application server
App server sends data to a client app via the chosen FCM connection server, using the appropriate XMPP or HTTP protocol.
Message Flow from Application server to Application on mobile device via FCM Servers
Send messages to specific device
Implementation of HTTP connection
- First issue a HTTP GET request to receive user device REGISTRATION TOKEN along with User_Id to differentiate particular user among all users.
- To send a notification message , issue a HTTP POST request. This will hit the FCM server url. https://fcm.googleapis.com/fcm/send
- This request consist two parts : HTTP header and body:
HTTP header
Header must contain following header:
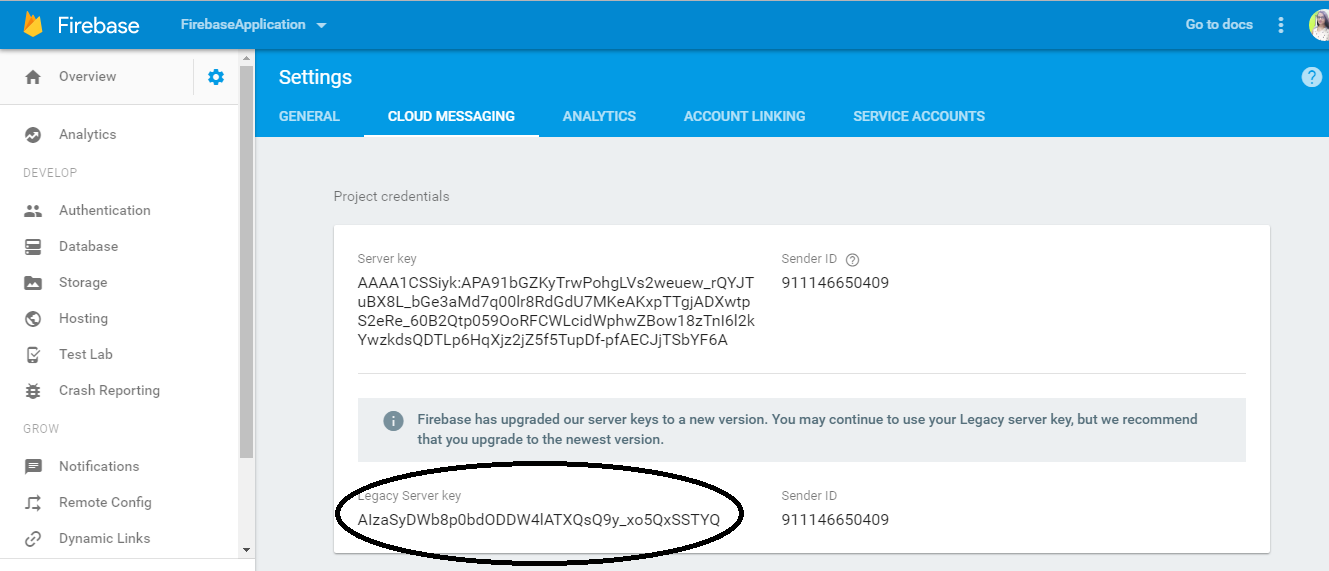
(i) Authorization: key= YOUR_SERVER_KEY
(You may use your legacy server key. To get this Click Firebase Console —> Project Name —-> Cloud Messaging Tab (you will get your server key) )
(ii) Content-Type: application/json for JSON; application/x-www-form-urlencoded;charset=UTF-8 for plain text.
If Content-Type is omitted, the format is assumed to be plain text.
HTTP Body
- To send message to specific devices , set “to” key to the registration to token for the specific app instance.
HTTP POST Request (final structure)
https://fcm.googleapis.com/fcm/send
Content-Type:application/json
Authorization:key=AZVHGDG-7726:FE663RFT44R4

{
"data":
  {
  "score": "r5t5t",
   "time": "15:26"
  },
"to" : "fhtryvu78647f457f356c65v75uvb76b87bu87.."
}
Send messages to device groups
Basically Group refers as a set of different devices. All devices in a group share a notification key, which is the token that FCM uses to send messages to all devices in that group.
The limit on data payload is 2KB when sending to iOS devices, and 4KB for other platforms. The maximum number of members allowed for a notification_key is 20.
1. Manage device groups
- First get all registration tokens which you want to add in a group.
- Create a Notification_key , which indicate the device group. You can generate this notification_key on App server as well as on your Android client app.
- You can remove, create, and update devices in a particular group.
2. Create device groups
- To create a device group, send a POST request that provides a name for the group, and a list of registration tokens for the devices. FCM returns a new notification_key that represents the device group.
- Send a request like https://android.googleapis.com/gcm/notification
HTTP POST Request
https://android.googleapis.com/gcm/notification
Content-Type:application/json
Authorization:key=API_KEY
project_id:SENDER_ID
{
   "operation": "create",
   "notification_key_name": "appUser-Chris",
   "registration_ids": ["4", "8", "15", "16", "23", "42"]
}
- The notification_key_name and notification_key are unique to a group of registration tokens.It is important that notification_key_name is unique per client app if you have multiple client apps for the same sender ID.
Response Format
A successful request returns a notification_key like the following:
{

  "notification_key": "HFDSGFJHGR...735735FGFHGFJGKHGGGG"

}
- Save the notification_key and the corresponding notification_key_name to use in subsequent operations.
3. Sending downstream messages to device groups
- Sending messages to a device group is very similar to sending messages to an individual device. Set the to parameter “to” the unique notification key for the device group.
HTTP POST Request
https://fcm.googleapis.com/fcm/send
Content-Type:application/json
Authorization:key=AIzaSyZ-1u...0GBYzPu7Udno5aA
{
 "to": "aUniqueKey",
 "data":
 {
   "hello": "This is a test message for Firebase Cloud Messaging Device Group Message!",
 }
}
Android side Implementation (Part 2 – Receiving Push Notification)
A service that extends FirebaseMessagingService. This is required if you want to do any message handling beyond receiving notifications on apps in the background ,to receive notifications in foregrounded apps, to receive data payload, to send upstream messages, and so on, you must extend this service.
Add the following code to your app’s manifest:
<service
      android:name=".MyFirebaseMessagingService">
    <intent-filter>
          <action android:name="com.google.firebase.MESSAGING_EVENT"/>
    </intent-filter>
</service>
Code Sample for receiving notification and generate local notification:
public class MyFirebaseMessagingService extends FirebaseMessagingService

{

private static final String TAG = "MyFirebaseMsgService";

 @Override
  public void onMessageReceived(RemoteMessage remoteMessage)
         {
             super.onMessageReceived(remoteMessage);

           // TODO(developer): Handle FCM messages here.
           // Not getting messages here? See why this may be: https://goo.gl/39bRNJ

          Log.d(TAG, "From: " + remoteMessage.getFrom());

          // Check if message contains a data payload.

          if (remoteMessage.getData().size() > 0) {
            Log.d(TAG, "Message data payload: " + remoteMessage.getData());

          }


    // Check if message contains a notification payload.

      if (remoteMessage.getNotification() != null)
      {
        Log.d(TAG, "Message Notification Body: " + remoteMessage.getNotification().getBody());
       sendNotification(remoteMessage.getNotification().getBody());

       }

      // Also if you intend on generating your own notifications as a result of a received         FCM
     // message, here is where that should be initiated. See sendNotification method below.
      }

     // [END receive_message]


  /**

   * Create and show a simple notification containing the received FCM message.

   *

   * @param messageBody FCM message body received.

   */


  private void sendNotification(String messageBody) {

      Intent intent = new Intent(this, MainActivity.class);

      intent.addFlags(Intent.FLAG_ACTIVITY_CLEAR_TOP);

      PendingIntent pendingIntent = PendingIntent.getActivity(this, 0 /* Request code */, intent,

              PendingIntent.FLAG_ONE_SHOT);


      Uri defaultSoundUri= RingtoneManager.getDefaultUri(RingtoneManager.TYPE_NOTIFICATION);

      NotificationCompat.Builder notificationBuilder = new NotificationCompat.Builder(this)

              .setSmallIcon(R.drawable.ic_launcher)

              .setContentTitle("FCM Message")

              .setContentText(messageBody)

              .setAutoCancel(true)

              .setSound(defaultSoundUri)

              .setContentIntent(pendingIntent);

    NotificationManager notificationManager =

              (NotificationManager) getSystemService(Context.NOTIFICATION_SERVICE);

    notificationManager.notify(0 /* ID of notification */, notificationBuilder.build());

  }