Almost half of today’s smartphone users will be using their phones and mobile wallets as their preferred method for payments and what preferred the most is security, privacy and reliability. Thus one of the largest mobile phones manufacturing company Apple inc. provides us such a wallet service which became far most popular since 2015 known as Apple Pay.
According to a recent report, Apple tops the charts with its digital wallet, and is expected to nearly double Apple Pay user base this year. According to the study, Apple Pay will hit 86 million users in 2017 globally, up from 45 million in 2016.
Introduction:
According to developer.apple.com, Apple Pay provides an easy and secure way to pay in your iOS apps, watchOS apps, and websites on Safari. From retail to restaurants, apps using Apple Pay are building great customer experiences and achieving successful business results.
Why to use Apple Pay?
- Customers prefer using Apple Pay as they can make purchases without having to enter their billing, shipping, and contact details.
- Customers and developers like the peace of mind that comes with the increased security and privacy of Apple Pay.
- Apple does not store or share a customer’s actual credit and debit card numbers, reducing the risk for merchants and app developers to manage and secure actual credit and debit card numbers.
Some Apps using Apple Pay:
- Groupon
- DoorDash
- OpenTable
- Trainline
- Indiegogo
- Chairish
- Fancy
Devices which supports Apple Pay?
The first and foremost feature needed for Apple Pay in iOS devices is TouchID. All iPhones having TouchID(iPhone 6,iPhone 6s, iPhone 6 Plus and released after) and iPads supports Apple Pay except iPhone 5s due to security concerns.
Why Apple Pay is different from In-app purchase?
For app developers interested in Apple Pay, it is important to understand the difference between Apple Pay and in-app purchase. Use Apple Pay within apps to sell physical goods such as groceries, clothing, and appliances. Use Apple Pay for services such as club memberships, hotel reservations, and tickets for events. Also approved nonprofits can use Apple Pay within an app or website to collect donations. On the other hand, use in-app purchase in apps to sell virtual goods such as premium content for your app and subscriptions for digital content.
Apple Pay integration:
Setting Up Your App for Apple Pay at developers account:
Create App ID:
- Head over to http://developer.apple.com and log in to your developer account.
- Go to Member Center and click on Certificates, Identifiers & Profiles\Identifiers\App IDs.
- Click on the + button to create a new App ID, name it and give it a Bundle ID of the format com.YOURDOMAIN.AppName. Make sure that Explicit App ID is selected, as wildcard App IDs aren’t able to make payments with Apple Pay.
- Finally, check the Apple Pay checkbox under App Services, click Continue and then click Submit to complete the creation of your new App ID.
Create Merchant ID and add it to App ID:
- Next, click on Merchant IDs under Identifiers in the left navigation pane.
- Click + to create a new merchant ID; use whatever description and merchant identifier you’d like. Generally, it’s recommended to create merchant identifiers in the reverse domain style that start with merchant, similar to bundle IDs.
- Click Continue and then click Register to create your new merchant ID.
Now that your App ID and merchant ID are set up, create a xcode project with same bundle ID you registered on developer account.
Setting Up an Xcode project:
Select the created project in the left navigation bar, then select the project target and change the Bundle Identifier to match the one you created above. Ensure that the Team selection box is pointing to the development team under which you created your App ID and merchant ID.
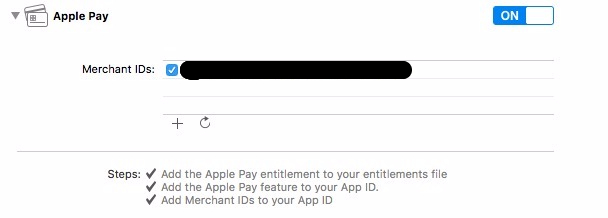
Next, click the Capabilities tab. Expand the Apple Pay section and ensure that the switch on the right is set to ON. Then push the refresh button below the merchant ID list; you should see the list populate with the merchant ID you added on the developer portal, if it wasn’t there already.
Finally, check the checkbox next to your merchant ID.
your screen should look like the image below:
Create Sandbox testing account for testing payment through Apple Pay:
To create a sandbox tester account, follow these steps:
- Sign in to iTunes Connect.
- On the homepage, click Users and Roles.
- Click Sandbox Testers.
- Select “+” to set up your tester accounts.
- Complete the Tester Information form and click Save.
- Sign out of your Apple ID on all testing devices and sign back in with your new sandbox tester account.
Configure your device to support Apple Pay:
To support Apple Pay in your device, your device must fulfil all the basic requirements which includes TouchID, Apple Pay supported regions and supported payment networks. If your device satisfies with all such requirements, you can add a sandbox testing payment cards in your device. You can all the sandbox testing cards from the link: https://developer.apple.com/support/apple-pay-sandbox/
Here you can find all the payment cards for testing for all the major payment networks like Visa, MasterCard, Discover and American Express. Add any of the cards to your device simply by following steps below:
- Go to Settings.
- Wallet & Apple Pay(only visible if your region is set to one of Apple Pay supported regions).
- Click on Add Credit or Debit Card > Next.
- Enter Card details Manually.
- Fill all the necessary card details including card name and card number.
- Click Next and wait for sometime and enter some more information related to card.
- Click Next and your card will be added to your device.
Let your code do the rest…
- First import Passkit framework in your view controller where you want to complete your payment.
import PassKit
- Add a delegate to your view controller named as
PKPaymentAuthorizationViewControllerDelegate.
class ViewController: PKPaymentAuthorizationViewControllerDelegate
- Create a constant for merchant ID which will be needed further.
private let applePayMerchantId = "merchant.com.innovationm.applepaydemo"
- Define all the supported payment networks like masterCard, Visa, Discover, American Express, etc.
let supportedPaymentNetworks = [PKPaymentNetwork.visa, PKPaymentNetwork.masterCard]
- Add the following delgate methods of
PKPaymentAuthorizationViewControllerDelegate to your code:
//1
func paymentAuthorizationViewController(_ controller: PKPaymentAuthorizationViewController, didSelect shippingMethod: PKShippingMethod, completion: @escaping (PKPaymentAuthorizationStatus, [PKPaymentSummaryItem]) -> Void) {

}

//2
func paymentAuthorizationViewController(_ controller: PKPaymentAuthorizationViewController, didAuthorizePayment payment: PKPayment, completion: @escaping (PKPaymentAuthorizationStatus) -> Void) {
     completion(.success)
}

//3
func paymentAuthorizationViewControllerDidFinish(_ controller: PKPaymentAuthorizationViewController) {
     controller.dismiss(animated: true, completion: nil)
}
What does these methods do?
Method 1:
This method is called every time a customer selects a shipping method.Method 2:
This method is called when user initialize payment with TouchID or Passcode. This method inspect the payment to determine whether the payment request was authorized.Method 3:
This method is called when the payment is successful and dismiss the Apple Pay view controller. - Create payment request on click of Apple Pay button:
Add the code below to your view controller file://create single payment request paymentReq = PKPaymentRequest()
- Add the code below to your payment request instance:
//create single payment request paymentReq = PKPaymentRequest() paymentReq?.merchantIdentifier = applePayMerchantId paymentReq?.supportedNetworks = supportedPaymentNetworks paymentReq?.merchantCapabilities = PKMerchantCapability.capability3DS paymentReq?.countryCode = "US" paymentReq?.currencyCode = "USD" paymentReq?.requiredShippingAddressFields = [.all]
Your payment request must contains the following objects:
- Merchant Identifier (which was added to your App ID)
- Supported Networks (networks supported by Apple Pay in user’s region like VISA, MasterCard, Discover, American Express)
- Merchant Capabilities (You must support the 3-D Secure protocol; support of the EMV protocol is optional)
- Country Code (the two-letter code for the country where the payment will be processed.)
- Currency Code (the three-letter code for the currency used by this payment request)
- Required Shipping address fields
- Payment Summary Items (includes the item price breakup such as product price, discount, tax etc)
- You can also add Shipping methods in your project which may be like same-day delivery, two-day delivery or standard delivery which most of the e-commerce sites are providing nowadays. To add Shipping methods, add the code below to your payment request:
let sameDay = PKShippingMethod(label: "Same Day Delivery", amount: 12.99) sameDay.identifier = "sameDay" sameDay.detail = "Guaranteed to be delivered same day." let twoDay = PKShippingMethod(label: "Two Day Delivery", amount: 8.99) twoDay.identifier = "twoDay" twoDay.detail = "Guaranteed to be delivered in two days." let standard = PKShippingMethod(label: "Standard Delivery", amount: 0) standard.identifier = "standard" standard.detail = "Delivery will be held within 7 - 10 days." //set the array of shipping methods to the shippingMethods property of payment request paymentReq?.shippingMethods = [sameDay, twoDay, standard] - Now to show the price breakup like Product price, tax price, discount, total price, you need to create payment summary items:
func itemToSell(shipping: Double) -> [PKPaymentSummaryItem] { let tShirt = PKPaymentSummaryItem(label: "Jones T-shirt", amount: 29.99) let discount = PKPaymentSummaryItem(label: "Discount", amount: -8.99) let shippingCost = PKPaymentSummaryItem(label: "Shipping", amount: shipping) let totalAmount = tShirt.amount.adding(discount.amount) let total = PKPaymentSummaryItem(label: "JK Enterprises", amount: totalAmount) return [tShirt, discount, shippingCost, total] } - Add the payment summary items to the payment request created above:
paymentReq?.paymentSummaryItems = self.itemToSell(shipping: 4.99)
- Present the Apple Pay controller on your view controller showing all the information for your payment like price breakup, item name, item anount, Shipping method, Shipping Address, etc:
let applePayController = PKPaymentAuthorizationViewController(paymentRequest: paymentReq!) applePayController.delegate = self if PKPaymentAuthorizationViewController.canMakePayments(usingNetworks: supportedPaymentNetworks) { self.present(applePayController, animated: true, completion: nil) } else { self.showAlert(title: "", message: "This Device cannot make Payments as it does't support ApplePay") } - Whenver a user taps on a shipping method, you need to change the shipping cost on the basis of shipping method. Add the following code to (didSelect shippingMethod:) function of PKPaymentAuthorizationViewControllerDelegate:
func paymentAuthorizationViewController(_ controller: PKPaymentAuthorizationViewController, didSelect shippingMethod: PKShippingMethod, completion: @escaping (PKPaymentAuthorizationStatus, [PKPaymentSummaryItem]) -> Void) { completion(.success, self.itemToSell(shipping: Double(shippingMethod.amount))) } - You can select payment option from your saved cards, change the shipping address, change the payment method.
Now you are all set to use Apple Pay in your App and sell your products to the customers. Have a safe and secure payments.
Thank You for your attention..