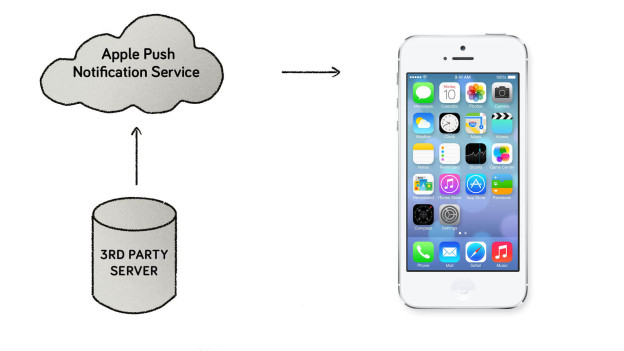
Notifications:
There are two types of notifications:
- Local Notification
- Remote Notification (Push Notification)
Local notifications are scheduled and sent by an app and delivered on the same device without involvement of internet.
Remote Notification (Push Notification): Push notifications are sent by remote server to the APNs and then it pushes the notification to the specific device.
Push Notification Integration in Application:
To integrate Push notification in your application, you need to perform certain task as followed:
- Configure An App for push notification
- Register your device to APNs server.
- Make a provider (server) which sent notification to your app.
- Send device token to server
- Make a payload which contain all necessary information needed by your app and send it to APNs.
- Handle the received notification using callbacks in AppDelegate.
- Configure App for Push Notification
Push notification requires more security. There are few steps to configure your app with push notification.
To Enable the Push Notification Service:
- Change your App ID to something unique. For that go to App Settings -> General and change Bundle Identifier
- To Enable push notification go to App Settings -> Capabilities -> Push Notification and turn the switch on.

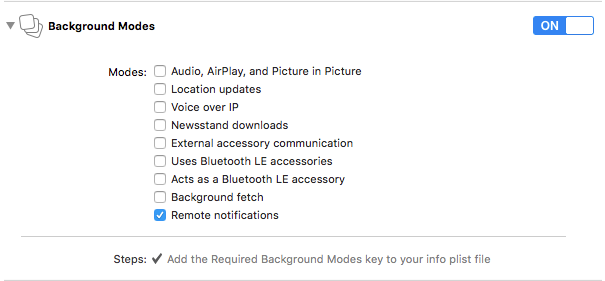
- (Only in Xcode 8) Go to Background Modes and turn it On. Check Remote Notifications option.
Registering for Push Notifications:
To register for Push notification we need to add some code in AppDelegate.swift class. For iOS 10 import UserNotifications Framework in AppDelegate file.
1. Register Device on APNs: For registration, add the following code in application(_:didFinishLaunchingWithOptions:launchOptions:) method:
func application(_ application: UIApplication, didFinishLaunchingWithOptions launchOptions: [UIApplicationLaunchOptionsKey: Any]?) -> Bool {

        if #available(iOS 10.0, *) {
            let center = UNUserNotificationCenter.current()
            center.delegate = self
            center.requestAuthorization(options: [.badge, .sound, .alert], completionHandler: {(grant, error)  in
		if error == nil {
                    if grant {
                        application.registerForRemoteNotifications()
                    } else {
                        //User didn't grant permission
                    }
                } else {
                    print("error: ",error)
                }
            })
        } else {
            // Fallback on earlier versions
            let notificationSettings = UIUserNotificationSettings(types: [.alert, .badge, .sound], categories: nil)
            application.registerUserNotificationSettings(notificationSettings)
        }
        return true
    }
For iOS 10, get the object of current notification center by UNUserNotificationCenter.current() and set the delegate.
requestAuthorization(…) method used to request to authorization to interact with user when notification arrives. The first time this method is called it shows a prompt to user to authorize the requested options. In completion of this method you need to call registerForRemoteNotifications(). It is used to register our application on APNs for push notifications.
For earlier versions of iOS, create the object of UIUserNotificationSettings and register it with registerUserNotificationSettings(_:) method.
For the UIUserNotificationTypes, you can use any combination of the following:
-> .badge, allows the app to show the number of notifications on the corner of the app’s icon.
-> .sound, allows the app to play a sound.
-> .alert, allows the app to display text via banner or alert.
2. Methods To Implement Push Notification:
Add following methods to register device on APNs and get device token:
application(_:didRegisterUserNotificationSettings:) This method is used for iOS 9 and below. It provide you the current permissions for push notification which is allowed in your app.
func application(_ application: UIApplication, didRegister notificationSettings: UIUserNotificationSettings) {
  if notificationSettings.types != .none {
    application.registerForRemoteNotifications()
  }
}
application(_:didRegisterForRemoteNotificationsWithDeviceToken:) This method is called when device is registered successfully with APNs server. It provide you device token.
// Token registered
func application(_ application: UIApplication, didRegisterForRemoteNotificationsWithDeviceToken deviceToken: Data) {
  let tokenString = hexString(data: deviceToken)
  print("token: ", tokenString)
}
application(_:didFailToRegisterForRemoteNotificationsWithError:) If device token is not generated by APNs then this method calls. It give you NSError object which describe the error in device registration.
func application(_ application: UIApplication, didRegisterForRemoteNotificationsWithDeviceToken deviceToken: Data) {
  let tokenString = deviceToken.reduce("") { string, byte in
    string + String(format: "%02X", byte)
  }
  print("token: ", tokenString)
}
3. Create an SSL Certificate and .p12 file: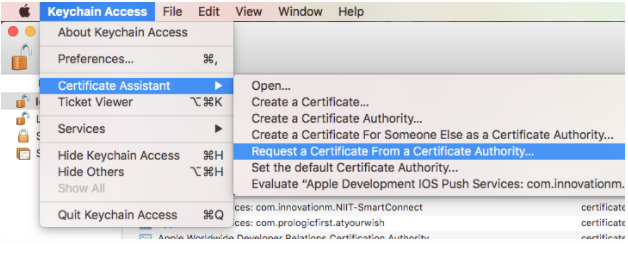
The Certificate Signing Request: Open the Keychain Access> Certificate Assistant> Request a Certificate From a Certificate Authority…
In the opened window, fill all the mandatory field User Email Address and Common Name fields. Besides that, click to the Saved to disk option to save the CSR file to the disk.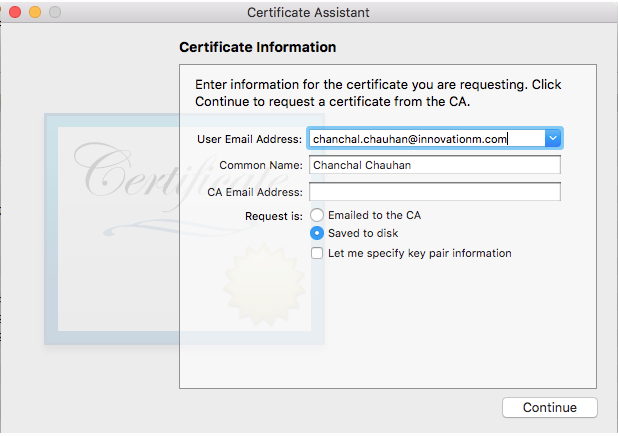
Click Continue and optionally choose a folder and a name for the CSR file right before you save it.
Configure the App ID for Push Notifications:
For iOS 10, you need not to add the provisioning profile in your developer account. Xcode 8 create all necessary certificates automatically. But you need to create SSL certificate. To do that, open your developer Account. Now select Certificates, Identifiers & Profiles > Identifiers > App IDs. Select your app id.
Now click on Edit and scroll down to Push Notifications section. Here are two sections which are used to create SSL Certificates for both the Development and Production stage. Click on first Create Certificate… button to create certificate for push notification for development.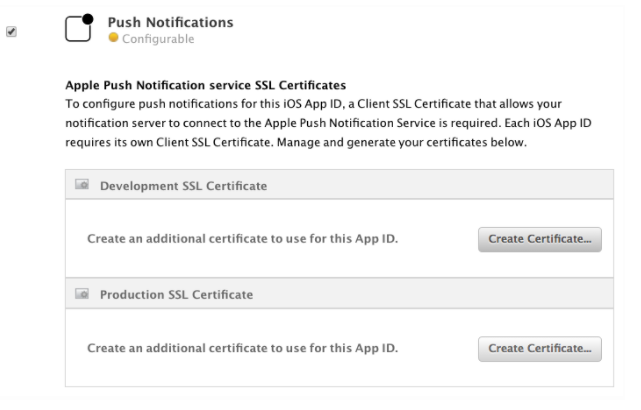
Now click on Continue button. Next, click to the Choose File… button and select the CSR certificate you just created.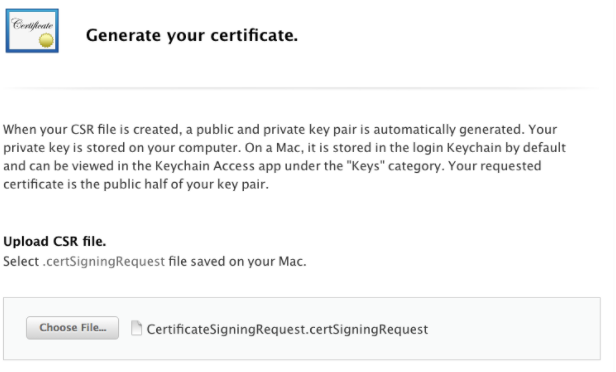
Click on Continue…
Here you have a new certificate which enable you to send notification in development mode. Download that certificate from here by clicking on Download button.
The name of downloaded file is aps_development.cer. Open the downloaded file in downloads Folder. Open That file by double click. It’ll be added in your Keychain Access. (Make sure that the new certificate is added in login Keychain. If it is in any other keychain option then move it in login)
When your certificate is added in Keychain Access, right click on it and select Export “…” option. Be sure that the .p12 file format is selected. Now click on Save button. If you do not want to add the password in it then simply click on OK button. If you set password then note it down somewhere.
Repeat same steps to create certificate for Production.
Send Push Notification:
Register Device on Server: Send device token to your provider(server) in either binary or hexadecimal format.
NOTE: Update device token on server only when the device token is changed from APNs. If device token is same and already registered with your server then you do not need to update it.
To send push notification you need to specify three things:
- The device token of the target device.
- The path to the push notification certificate file.
- The payload of the push notification (message, badge number, sound etc).
Send Push Notification Request to APNs:
To send notification your server needs to perform three main tasks:
- Generate a notification payload.
- Attach Payload and the device token to an HTTP/2 request.
- Send this request to APNs over a persisted and secure channel.
Here is an example of payload:
{
  “aps” : {
    “alert” : {
      “title” : “NITL ACUMEN BI RFS CODA Dev Offshore”,
      “body” : “Send a Message - PN testing group”
    },
    “sound” : “default”
  },
  “groupName” : “Testing Group”,
  “type” : “Send a Message”,
  “projectId” : 186
}
If you need to test push notification on your app then you can use APN Tester Free. In this application you just need to enter device token of your device, payload and browse the certificate which is downloaded from your developer account and then press Push button. You will receive a notification.
Push Notification Handling on Device:
1. If you have version iOS 9.3 or below then implement application(_:didReceiveRemoteNotification:). In this method you can perform the action what you want to perform on receiving a notification. You can have a callback in this method if your app is active. If your application is in background or inactive then this method is called when you tap on the notification.
func application(_ application: UIApplication, didReceiveRemoteNotification userInfo: [AnyHashable : Any]) {
  print(userInfo)
  if application.applicationState == .active {
    //write your code here when app is in foreground
  } else {
    //write your code here for other state
  }
}
You will receive the payload in userInfo. You can retrieve all the information sent in your payload. We do not get push notification in Active state of App.
2. In iOS 10 we can get notification in active state. To handle a notification in Active state use implement method userNotificationCenter(_:willPresent :withCompletionHandler)
@available(iOS 10.0, *)
func userNotificationCenter(_ center: UNUserNotificationCenter, willPresent notification: UNNotification, withCompletionHandler completionHandler: @escaping (UNNotificationPresentationOptions) -> Void) {
  completionHandler(.alert)
}
Here you can pass the notification option in the completion block. This will show you the notification on the notification center even if your application is in Foreground.
3. When you tap on the notification userNotificationCenter(_: didReceive :withCompletionHandler) method will be called. Here you can define your action what you want to perform on notification.
@available(iOS 10.0, *)
func userNotificationCenter(_ center: UNUserNotificationCenter, didReceive response: UNNotificationResponse, withCompletionHandler completionHandler: @escaping () -> Void) {
  print(response)
  //write your action here
}
4. When app is in killed state. Then on the tap of notification application(_:didFinishLaunchingWithOptions) method will be called. launchOption contains the payload if app is launched by tap on notification. For that write the given code in this method:
if launchOptions != nil{
  let userInfo = launchOptions?[UIApplicationLaunchOptionsKey.remoteNotification]
  if userInfo != nil {
    // Perform action here
  }
}
After doing all this you will be able to receive and handle the push notification.
 End to End Technology Solutions
