Sencha Touch is a high-performance HTML5 mobile application framework. You can use Sencha Touch to produce a native-app-like experience inside a browser or in a hybrid shell. Sencha Touch supports Android, iOS, Windows Phone, Microsoft Surface Pro and RT, and BlackBerry devices. For more information go to http://docs.sencha.com/touch
I am going to talk about how to set-up the Development Environment and Build process to get you ready on Sencha Touch.
Development Environment Set-up
To create a Sencha Touch application, Development Environment is required. It is very simple to set-up the Environment. Before setting-up the Environment, we need some software. These are mentioned next.
Required Software:
1. Sencha Cmd
2. JRE (Java Runtime Environment) Version 1.7
3. Ruby version 1.9.3
4. A Web Server installed locally
5. A modern web browser such as Chrome or Safari
6. Sencha Touch SDK
Download and Installation:
1. Sencha Cmd 
Sencha Cmd provides full set of application development life-cycle management features.
Download – http://www.sencha.com/products/sencha-cmd/download
Installation – You will get an .exe file in Windows. Run it and follow the wizard.
(Example Location for Sencha Cmd- D:\SenchaTouch\SenchaCmd)
2. JRE (Java Runtime Environment) Version 1.7![]()
Sencha Cmd is written in Java and hence needs JRE to run. JRE version 1.7 (1.6 also works, but 1.7 is best).
Download –
http://www.oracle.com/technetwork/java/javase/downloads/jre7-downloads-1880261.html
Installation – You will get an .exe file in Windows. Run it and follow the wizard.
3. Ruby version 1.9.3
Ruby is required to create compiled CSS used by Touch. In Sencha Touch app, we do not use CSS directly. We use SASS (Syntactically Awesome Stylesheets) for styling. So Ruby is required to compile SASS. After compilation a CSS file is generated.
Windows: Download Ruby 1.9.3.x from http://rubyinstaller.org/downloads/.
Mac: Ruby is pre-installed. You can test which version you have with the ruby -v command.
Note - If you have version 2.0, download the Ruby Version Manager (rvm) and use  this command to download and install Ruby: rvm install 1.9.3 --with-gcc=clang
Set your PATH variable to point to the Ruby 1.9.3 install directory.
Installation – You will get an .exe file in Windows. Run it and follow the wizard.
(Example Location for Ruby installation directory – D:\SenchaTouch\Ruby193)
Note – Check for path has been set for JRE, SenchaCmd and Ruby in environment variables. If not set then set it. Ex.
JRE – C:\Program Files\Java\jre7\bin
SenchaCmd – D:\SenchaTouch\SenchaCmd\Sencha\Cmd\3.1.2.342
Ruby – D:\SenchaTouch\Ruby193\bin
4. A Web Server installed locally.
For this, XAMPP can also be used. XAMPP is an easy to install Apache distribution containing MySQL, PHP and Perl
Download –
http://download.cnet.com/XAMPP/3000-10248_4-10703782.html
Installation – You will get an .exe file in Windows. Run it and follow the wizard.
5. A modern web browser such as Chrome or Safari. 
6. Sencha Touch SDK
Download link- http://www.sencha.com/products/touch/download/
You will get a zip file. Extract it to any location on your computer.
Example – D:\SenchaTouch\
Create simple Sencha Touch Application
1. Open command prompt.
2. Change directory to Touch SDK
(For Example – D:\SenchaTouch\touch-2.2.1).
3. Create a new Project – Type command sencha generate app <AppName> <Path to Folder for this project>
Ex – sencha generate app SampleApp C:\projects\SampleApp
To know about Sencha Cmd and its commands check this link- http://docs.sencha.com/touch/2.2.1/#!/guide/command
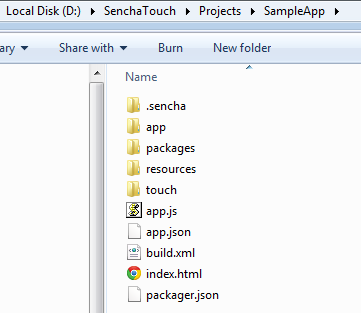
Now a simple Sencha Touch app is ready. Your app structure should look like this-

4. To run the application, copy the folder (Ex SampleApp) on the web server. Start web server. Open the browser and access the app http://localhost/SampleApp
If you are using XAMPP, create your application inside htdocs folder (Ex C:\xampp\htdocs). To Start server in XAMPP (open ‘xampp control panel’ then start Apache). After this open a browser and type localhost/appName.
To create application build
To create build of your application
1. Open command prompt.
2. Change to Application Folder (Ex – D:\SenchaTouch\Projects\SampleApp)
3. Type sencha app build package
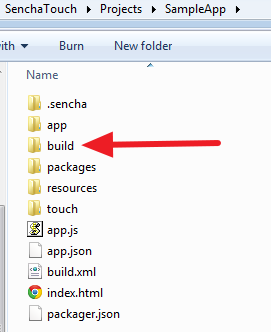
Open your appFolder. Inside it you can see a build folder. This folder contains another folder named as your appName. For example – my app name is SampleApp. So the structure of this folder is as below:
Your build folder structure should also be same as above described structure. To check your build is running properly, open index.html. You can see the same app as it was earlier. Now either you can distribute this build or can deploy it on server.
So in this way we can create a simple Sencha Touch App and can make build. For more information please visit- http://docs.sencha.com/touch/
 End to End Technology Solutions


