Let’s Start With a Story,
There is a guy Elliot who uses the plastic money a lot. Every time he visits any shop he asks them to swipe his card instead of paper cash. Now, he visits a Shop-A to buy his daily grocery. After choosing his stuff, Shopkeeper asks him to go to their friend’s Shop-B for card payment (as they don’t have any Card Swiping Machine) and then take your grocery back.
It’s something irritating that you have to visit other Shop for payment every time you purchase something. Next day, he visits Shop-C for daily shopping and later he come to know that they have their own Card Swiping machine. From that day, he visits Shop-C on the regular basis as it is more hassle free and less time consuming than Shop-B.
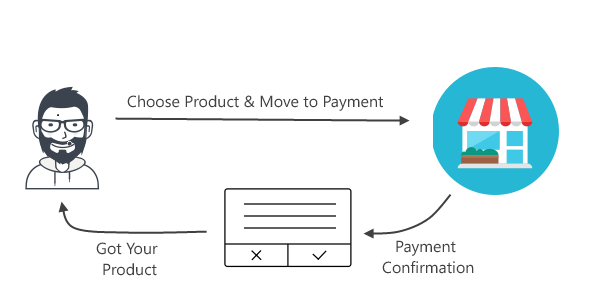
Fig: This is Shop A where you’ve to move PayU (Shop-B) for Payment and then he confirms about the payment. And, then he brings his purchased grocery back.
Next,
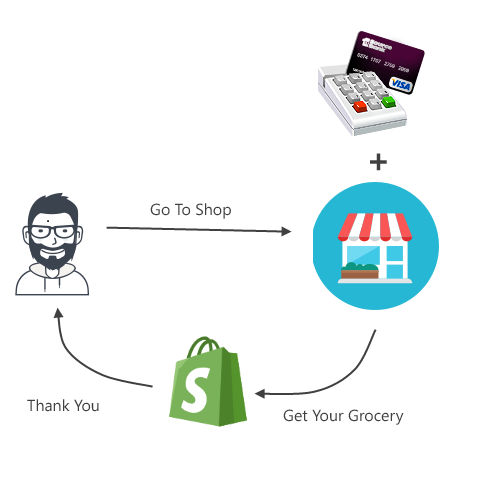
Fig: Shop C which has their own Card Swiping Machine. So, he doesn’t have to rely on other payment shops.
Moral of The Story,
- Shopping in Shop-A took more time than Shop C.
- Shopping in Shop-A mean, You’ve to visit Shop A and then Shop-B for payment and then come back to Shop-A to pick up your stuff.
- While Shopping in Shop-A, you’ll always have two receipts. One is payment receipt which you’ll get it from Shop-B after payment. And, Shop-A will give your stuff after verifying Payment Receipt (which you got from Shop-B)
- Shopping in Shop-C is hassle free.
I just want to validate my point that “Elliot is more comfortable in shopping from Shop-C than Shop-A”.
With The Same Anatomy,
Imagine You are using an eCommerce App (equate with Shop-A). You choose your products and then add into your cart. And, when you click on Pay button it moves to Paypal ( any 3rd Party Payment Gateway like Citrus, PayU or Payzippy) for actual payment and after paying you’ll move to your App.
And, then there is another eCommerce App which has payment module but it took few seconds to do payment there.
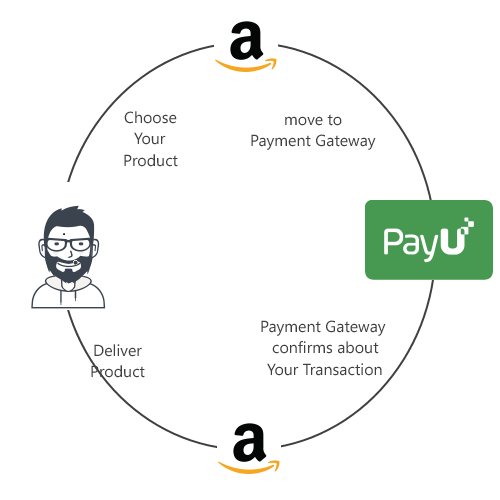
Fig: Say, Amazon© App uses PayU© as Payment Gateway. A User always move to PayU page when they have to purchase something.

Fig: Then, there is InApp Payment which keeps you on the same screen.
So, You conclude with two kinds of Payment Models:
- Someone (Third Party) else is doing payment transaction on your behalf and then it notifies you about the payment.
- There is an In-House Device which does the payment transaction for you and get you notified(And, Yes this is InApp Purchase).
Hold On, Don’t get biased about In App Purchase. There are pro & cons about everything. So has InApp Purchase. InApp Purchase is not the king.
What is InApp Purchase,
InApp Purchase is an inbuilt payment gateway which OS has, and User can use it when App has featured InApp Payment Module.
So, Developer integrate this InApp Purchase in their App as User has no security issue in sharing their card details.
By Native Payment Gateway I meant InApp Payment Module.
If It is such a Rockstar then why don’t we always use this,
Like every dispute, This is also ‘coz of i.e. Money Shares. Whenever user pays an amount via InApp Payment Module, 70% of that amount is given to App Developer and 30% (Seriously !!) will remain with Apple. Let me remind, 30% is too much for any payment gateway.
Unlike, Native InApp Purchase, Third Party Payment offers better pricing in terms of sharing. Like, they charge 1% of every transaction amount. Or, they don’t charge for first thousand transactions. They have different schemes.
When To Use In-App Purchase,
Whenever you are selling any digital content or subscription or unlocking any feature in your App then you must use InApp Purchase. Basically, If you are charging money for something which doesn’t physically exist in reality then you ought to use InApp Purchase as your Payment Gateway.
Yes, You’ve to Use InApp Purchase
Apple is too particular about InApp Purchase. They can reject your App while submission process if you use any 3rd Party Payment Gateway to sell your digital Content. Unlike Apple, Google has no such recommendation for selling digital content via InApp Purchase Only. You can use any 3rd Party Payment Gateway to sell your subscription or digital content.
When Not To Use InApp Purchase,
When you selling something physical (say, any product). Like, you can’t use InApp Purchase for selling physical goods, clothes, books or any things which exist in nature. In such case, Apple gives you an alternative Apple Pay but, it doesn’t belong to every region of the world.
Sorry to say, Apple Pay has no service in India. So, We’ve to use 3rd Party Payment Gateway like PayPal, PayTM, PayZippy, PayU, CCAvenue or Citrus.
Apple Pay vs InApp Purchase
| Apple Pay | InApp Purchase |
| Sell Physical Goods | Sell Virtual Goods |
| Apple takes no share in transactions. | Apple takes 30% of every transaction. |
| Passkit.framework | StoreKit.framework |
Types of InApp Purchase
In-App Products are of Four Types,
- Consumable Products
- Non-Consumable Products
- Auto-Renewing Subscription Products
- Non-Renewing Subscription Products
If you are confused, Why this heck i.e. Types of Product. Why can’t we just pay and move on.
So, Apple confirms what kind of payment is this. By the end of this section, you ‘ll get to know why is this Product Types.
Consumable Products
Consumable Products are such products which you can purchase as many times as you want. Say, you have a Game App where you want to sell Player’s Life. So, User can pay as many times as he wants. There should not be any limit. If You are offering such kind of product to the user then it comes under Consumable Products.
Examples: Buy Coins, Buy Game Hint.
Non-Consumable Products
It’s just contrast to the Consumable Product. You can only pay once for such kind of product. Your Purchases get mapped with your Apple ID and you don’t need to bother if you uninstall your app or change your iPhone.
Such Products are mostly used by those Apps which offer some unlocked feature. Say, I have an App which has Advertisement (looks irritating to the user sometimes) and, you have an option in your app. You can disable this Advertisement if you pay a certain amount. If You pay for once, then you change your iPhone for some reason. Then, it’s obvious you’ll not pay for the same feature which you’ve paid earlier.
Example : Enable Pro version of App, Advertisement Free App.
Auto-Renewing Subscription
Say, you’ve a digital magazine which gets the new edition every month. So, you want to charge your user every month. So, It’s quite irritating for your User to do the payment process just to read your magazine. To make it hassle-free, you can use Auto-Renewing InApp Purchase which will deduct amount automatically from your synced credit card (or, whatever your payment mode is).
Most of the time, these are used by Digital Magazine and Premium Streaming App like Netflix.
Non-Renewing Subscription
Non-Renewing subscriptions are only valid for a period of time. After that, you have to pay again manually. It’s just an opposite of Auto-Renewing Subscription. These are mostly used in Subscription based App which offers a period based usage of their App.
Say, there is a trail section in NetFlix where you can watch all TV Series with a nominal price.
Demonstration
We are going to create an App where we learn how to purchase via InApp Purchase.
Milestones:
- Prepare Your App In iTunes
- Code InApp Purchase in your App
- Test via Sandbox Account
Milestone 1
Step1.
Login into your iTunes Account and create your App.
Step2.
Get in MyApp Section
Step3.
Get in Features Tab > InApp Purchase section

Step4.
Click on + Button and create your Product.
Step5.
For Now, I’m creating Consumable Product. It’s up to you what type you choose. (Note: It’s always up to your Business Requirement)

Step6.
While creating your InApp Product, there are few tricky options
- Reference ID : Something Unique and it’s totally up to you.
- Product ID : It’s most important from development point of view. You’ll need it later. It must be unique. (follow reverse domain name convention with product name).
- Pricing Tier : Choose The Price Tier from dropdown. (Note: You are bound to choose from the list. You can’t creat amount as per you wish. You’ve have to choose from the list)
- Title And Description : It’s the text which get in the list while purchasing. Title should be the POI of the product. It can be localizable Text.
Choose Pricing from the Pricing List,
Pass the Title Text and Description Text of the Product.
And, Last you have to give the screenshot of the InApp Page where you are using InApp Purchase. It is for Apple Revving while submission. And, you have to give them one of the sandbox account so that they can test it.
And, this is final you have successfully set-up your InApp Product. You just need to note down your product Id’s which you have created.
Say, I have this
Example : com.abc.game_help, com.abc.extra_coins
Milestone 2
Step1.
Import InAppManager.swift in your Project.
GitHub: https://github.com/greenSyntax/InAppManager
- First, we will request for the list of InApp Products which we have just created in iTunes.
- Second, We’ll choose one of them from the list and request for Purchase.
- After Transaction, we’ll get the transaction data whether it’s a successful transaction or a failed one. And, then take our decision.
Step2.
In this step, we’ll pass the array of InApp Product Ids and get the Product Details.
First, create the InApp Manager Singleton Instance,
let inAppManager = InAppManager.shared
In ViewDidLoad(),To Request List of Products, you have to call requestForInAppProducts() of InAppManager.
var inAppProductsId:[String] = ["com.abc.game_help", "com.abc.extra_coins"];
//Configure InApp Manager

inAppManager.configureInAppProducts(nameOfProducts: inAppProductsId)
//Request For InApp Products
inAppManager.requestForInAppProducts(products: { (products) in

	    // List of InApp Products
	    print(products)

        }) { (error) in

            // Error while getting Products
        }
And, In Response, you will get two closures success and failure. In Success Closure, you will get InApp Products array which contains details about your product (i.e. Name, Description, Prices ) wherein Failure block, you will get InAppError object.
On Success callback, I want to set the tableView data source and reload the Table so that it’ll reflect in your table View.
Step3.
Now, you choose any product for purchase. In that case you have to call purchaseProduct(product:) method of InAppManager.
//Purcahse Product
inAppManager.purchaseProduct(product: product.productInstance!, onSuccess: { (transaction) in

            //onSuccessfull transaction

        }) { (error) in

            //onError

        }
On Success, you will get InApp Transaction Object which has Transaction date and transaction unique Id which you use for Receipt Verification. And, error is always of InAppError Type.
Milestone 3:
In this milestone, we’ll test the InApp Purchase.
So first, we have to create Sandbox User in iTunes.
Step1. Go to iTunes Connect > Users
Step2.
Choose Sandbox Testers,
Step3.
Fill the basic details.
While Testing changes your iTunes User from your iPhone Settings and add the Sandbox User. It won’t work in Simulator.
Conclusion
If you want to sell digital content then you must use InApp Purchase. Here, I’ve made a StoreKit Wrapper class i.e. InAppManager.swift (https://github.com/greenSyntax/InAppManager).
 End to End Technology Solutions


