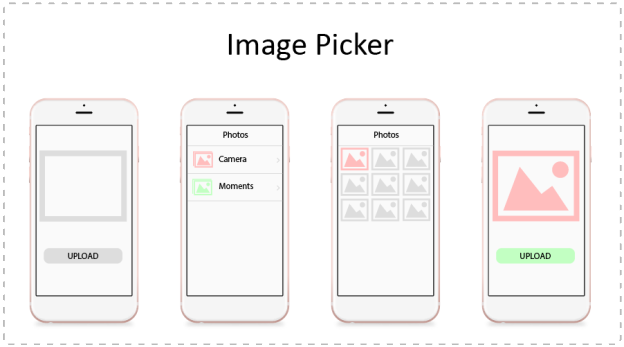
In your iOS application there are many scenario when you have to let user select an image from photo library or capture an image using Camera. In this post we will see how you can use UIImagePickerController to let user capture an image or select it from photo album. Image Picker Controller is very easy and handy to pick an image.
Setting up the Info.plist
To access Camera or Photo Album you have to first make an entry in Info.plist describing the reason why we need to access Camera or Photo Album.
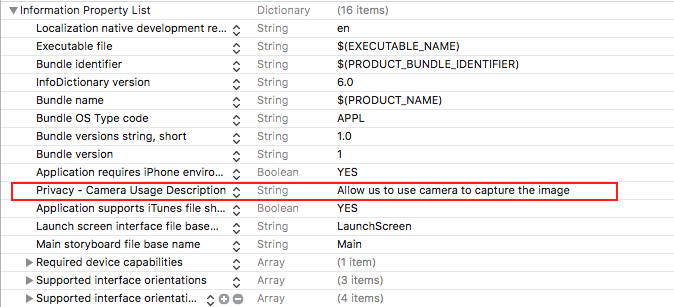
For Camera add NSCameraUsageDescription key in Info.plist:
or you can use source code editor and add following code:
<key>NSCameraUsageDescription</key>
<string>Allow us to use camera to capture the image</string>
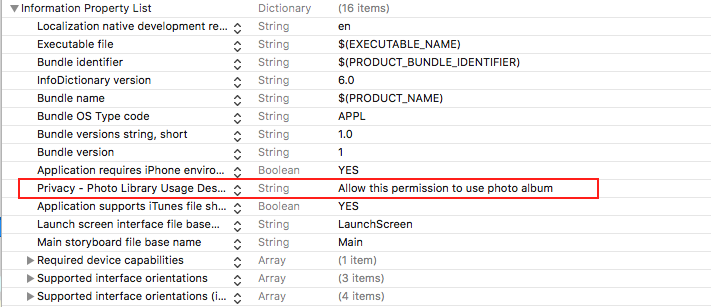
To access Photo Album add NSPhotoLibraryUsageDescription key in Info.plist
or you can use source code editor and add following code:
<key>NSPhotoLibraryUsageDescription</key>
<string>Allow this permission to use photo album</string>
Using UIImagePickerController
Let’s start by creating an object of Image Picker Controller and setting the source and delegate to UIImagePickerController.
let imagePicker = UIImagePickerController()
imagePicker.sourceType = .camera
imagePicker.allowsEditing = true
imagePicker.delegate = self
Here, In line 1 we created an object of UIImagePickerController, and then set the sourceType to image picker object as Camera. There are three source type available which you can use for this property:
- UIImagePickerControllerSourceType.photoLibrary
- UIImagePickerControllerSourceType.camera
-
UIImagePickerControllerSourceType.savedPhotosAlbum
The difference between photo library and saved photo album is that photo album gives access to all photos and albums available on the device and saved photos album gives access to only photos saved locally to your device and no access to album.
The Allow editing option on line 3 is to tell image picker controller that image needs to be cropped if set true.
The fourth line is for setting the delegate of image picker controller. We will implement the delegate later in the post.
Before presenting the UIImagePickerController you may also check the availability of the source type by following code otherwise app will crash on simulator if you try to access Camera.
if UIImagePickerController.isSourceTypeAvailable(UIImagePickerControllerSourceType.camera) {
}
Apple documentation indicates that the UIImagePickerController must be presented in pop over on iPad, So add the following code to present UIImagePickerController in pop over on iPad’s.
imagePicker.modalPresentationStyle = .popover
imagePicker.popoverPresentationController?.delegate = self
imagePicker.popoverPresentationController?.sourceView = view
In the above code we state that the image picker to be present as pop over (Line 1). We also set an delegate to the UIPopoverPresentationController so that we can get callback when user dismiss the pop over by clicking outside of it, We will implement this delegate later in the post. In the last line we have set a source view of pop over, you can set it to the button or any view so that pop over can use it as a reference point as it needs an reference rectangle to pop out from.
Now we just have to present the image picker controller.
present(imagePicker, animated: true, completion: nil)
If you wish you can set the alpha of current view controller’s view to some value (like 0.5) to add a overlay on the iPad.
view.alpha = 0.5
Implementing UIImagePickerControllerDelegate
Now let’s implement the delegate UIImagePickerControllerDelegate to get the image captured from camera or picked from photo album. To implement this delegate you also need implement UINavigationControllerDelegate.
extension ViewController : UINavigationControllerDelegate, UIImagePickerControllerDelegate {

  func imagePickerControllerDidCancel(_ picker: UIImagePickerController) {
   picker.dismiss(animated: true)
  }

  func imagePickerController(_ picker: UIImagePickerController, didFinishPickingMediaWithInfo info: [String : Any]) {
   if let editedImage = info[UIImagePickerControllerEditedImage] as? UIImage {
    // Use editedImage Here
   } else if let originalImage = info[UIImagePickerControllerOriginalImage] as? UIImage {
    // Use originalImage Here
   }
   picker.dismiss(animated: true)
  }
}
Here in each method we dismiss the image picker controller. The key UIImagePickerControllerEditedImage is used for getting the cropped image. it will return the image if the allowEditing property of UIImagePickerController was set to true. The key UIImagePickerControllerOriginalImage is used to get the original image captured or selected.
If you have set the alpha of current view controller’s view then you must set it to 1.0 in both of these methods. In this case you also need to implement the UIPopoverPresentationControllerDelegate and reset the alpha of the view.
extension ViewController: UIPopoverPresentationControllerDelegate {
  func popoverPresentationControllerDidDismissPopover(_ popoverPresentationController: UIPopoverPresentationController) {
   view.alpha = 1.0
  }
}
Check Camera Permission
If you want to check the permission before presenting the UIImagePickerController you can use following code to determine the permission given by user and decide what to do.
First you need to import the AVFoundation framework.
let cameraMediaType = AVMediaTypeVideo
let cameraAuthorizationStatus = AVCaptureDevice.authorizationStatus(forMediaType: cameraMediaType)
switch cameraAuthorizationStatus {

case .authorized:
  // Access is granted by user.
  break

case .notDetermined:
  // It is not determined until now.
  break

case .restricted:
  // User do not have access to camera.
  break

case .denied:
  // User has denied the permission.
  break
}
Check Photo Album Permission
To check the photo album permission use following code.
You have to import the framework Photos for this to work.
let photoAuthorizationStatus = PHPhotoLibrary.authorizationStatus()
switch photoAuthorizationStatus {

case .authorized:
  // Access is granted by user.
  break

case .notDetermined:
  // It is not determined until now.
  break

case .restricted:
  // User do not have access to photo album.
  break

case .denied:
  // User has denied the permission.
  break
}
That’s it. That’s all you have to do to use UIImagePickerController. 🙂
 End to End Technology Solutions


