Imagine managing your entire fleet of AWS EC2 instances with just a few clicks- no more manual hassle, no more guesswork.
This document provides a detailed breakdown of a Jenkins pipeline designed for managing AWS EC2 instances. The pipeline automates common EC2 operations such as listing, starting, stopping, and rebooting instances. A critical aspect of this automation is ensuring proper AWS Identity and Access Management (IAM) permissions are in place to allow the pipeline to interact securely with your AWS environment. This document will cover the pipeline’s functionality, the specific IAM permissions required, and step-by-step instructions on how to assign these permissions, complemented by visual flow diagrams.
Pipeline Overview
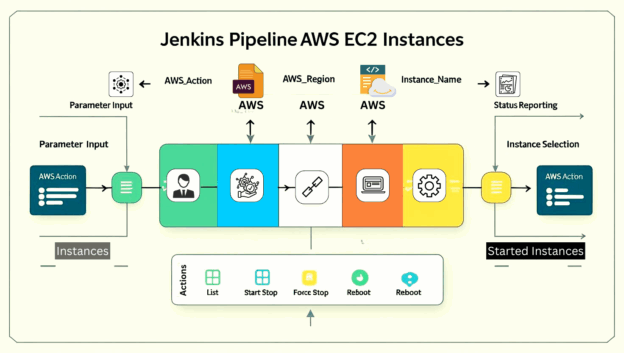
The provided Jenkins pipeline is structured to offer a user-friendly interface for managing EC2 instances. It leverages Jenkins parameters for user input and AWS CLI commands for execution. The pipeline consists of the following main stages:
2.1. Parameters
The pipeline defines several parameters that allow users to control its behavior:
AWS_ACTION: A choice parameter to select the desired EC2 action (List Instances, Start Instance, Stop Instance, Force Stop Instance, Reboot Instance).
AWS_REGION: A string parameter to specify the AWS region where the instances are located (defaulting to ap-south-1 ).
INSTANCE_NAME: A dynamically populated choice parameter that lists available EC2 instances by name after the Initialize stage.
2.2. Stages
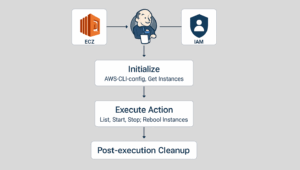
2.2.1. Initialize
This stage is responsible for setting up the AWS environment and gathering instance information:
- AWS Credentials Configuration: It retrieves AWS access key ID and secret access key from Jenkins credentials ( aws-credentials ) and configures the AWS CLI.
- AWS Connectivity Verification: Performs an aws sts get-caller-identity command to verify successful AWS connectivity and credential setup.
- Instance Discovery: Uses aws ec2 describe-instances to fetch a list of all EC2 instances, extracting their names, IDs, and states. This data is then used to dynamically populate the INSTANCE_NAME parameter for subsequent stages.
2.2.2. Execute Action
This stage performs the selected EC2 action based on the AWS_ACTION parameter:
List Instances: Executes aws ec2 describe-instances to display a formatted table of all EC2 instances, including their names, IDs, states, instance types, and launch times.
Start Instance: Calls aws ec2 start-instances for the selected instance. Stop Instance: Calls aws ec2 stop-instances for the selected instance.
Force Stop Instance: Calls aws ec2 stop-instances –force for the selected instance.
Reboot Instance: Calls aws ec2 reboot-instances for the selected instance.
Status Verification: After modification actions (Start, Stop, Reboot), the pipeline waits for 30 seconds and then verifies the instance’s new status using aws ec2 describe instances .
2.2.3. Post-execution Cleanup
This final stage ensures that temporary AWS CLI configuration files are removed from the Jenkins agent to maintain a clean and secure environment.
2.3. Pipeline Flow
The overall flow of the pipeline can be visualized as follows:
- IAM Permissions Required
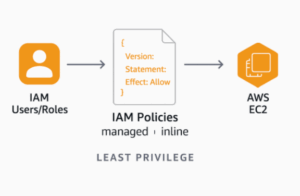
For the Jenkins pipeline to successfully interact with AWS EC2, the IAM entity (user or role) associated with the Jenkins credentials ( aws-credentials ) must have the necessary permissions. The principle of least privilege should always be applied, granting only the permissions essential for the pipeline’s operations.
3.1. Core Permissions
The following IAM actions are fundamental for the pipeline’s functionality:
sts:GetCallerIdentity : This permission is used in the Initialize stage to verify the AWS credentials and connectivity. It allows the pipeline to confirm the identity of the IAM entity making the AWS calls.
ec2:DescribeInstances : This is a crucial permission required for listing and describing EC2 instances. It is used in the Initialize stage to dynamically populate the INSTANCE_NAME parameter and in the Execute Action stage for the ‘List Instances’ action and for status verification after modification actions. It’s important to note that ec2:DescribeInstances does not support resource-level permissions; therefore, if granted, it allows describing all instances in the specified region [4, 10].
3.2. Action-Specific Permissions
Depending on the AWS_ACTION selected, additional permissions are required:
ec2:StartInstances : Required for the ‘Start Instance’ action. This permission allows the pipeline to initiate the start process for specified EC2 instances. This action supports resource-level permissions, meaning you can restrict it to specific instances or instances with certain tags [1, 2, 5].
ec2:StopInstances : Required for the ‘Stop Instance’ and ‘Force Stop Instance’ actions. This permission allows the pipeline to stop specified EC2 instances. Similar to Start Instances , this action also supports resource-level permissions [1, 2, 5].
ec2:RebootInstances : Required for the ‘Reboot Instance’ action. This permission allows the pipeline to reboot specified EC2 instances. This action also supports resource-level permissions [1].
3.3. Example IAM Policy
Below is an example IAM policy that grants the necessary permissions for this pipeline. It adheres to the principle of least privilege by specifying only the required actions. For StartInstances , StopInstances , and RebootInstances , you can further refine the Resource element to restrict actions to specific instances or instances with particular tags. For simplicity, the example below grants access to all instances ( * ) for these actions, but it is highly recommended to narrow this down in a production environment.
{
"Version": "2012-10-17",
"Statement": [
{
"Effect": "Allow",
"Action": [
"sts:GetCallerIdentity"
],
"Resource": "*"
},
{
"Effect": "Allow",
"Action": [
"ec2:DescribeInstances"
],
"Resource": "*"
},
{
"Effect": "Allow",
"Action": [
"ec2:StartInstances",
"ec2:StopInstances",
"ec2:RebootInstances"
],
"Resource": "arn:aws:ec2:*:*:instance/*"
// For production, consider restricting to specific instances or tags: // "Resource": "arn:aws:ec2:REGION:ACCOUNT_ID:instance/i
xxxxxxxxxxxxxxxxx"
// "Condition": {
// "StringEquals": {
// "ec2:ResourceTag/Environment": "Development"
// }
// }
}
]
}
4. How to Assign Required Permissions
Assigning IAM permissions involves creating an IAM policy with the necessary actions and then attaching this policy to an IAM user or role that your Jenkins pipeline will use. The recommended approach for Jenkins is to use an IAM Role, especially if Jenkins is running on an EC2 instance, as this allows for temporary credentials and avoids hardcoding access keys.
4.1. Creating an IAM Policy
1. Navigate to IAM Console: Open the AWS Management Console and navigate to the IAM service.
2. Create Policy: In the left-hand navigation pane, choose Policies, then click Create policy.
3. Choose JSON Editor: Select the JSON tab to enter the policy document directly.
4. Paste Policy Document: Copy the example IAM policy provided in Section 3.3 and paste it into the JSON editor.
5. Review and Save: Click Next: Tags, then Next: Review. Provide a Name for your policy (e.g., JenkinsEC2ManagementPolicy ) and an optional Description. Click Create policy.
4.2. Attaching the Policy to an IAM User or Role
4.2.1. Attaching to an IAM User (Less Recommended for Production) If your Jenkins setup uses a dedicated IAM user with access keys:
- Navigate to Users: In the IAM console, choose Users from the left-hand navigation pane.
- Select User: Select the IAM user that your Jenkins pipeline uses (the one whose access keys are configured in Jenkins as aws-credentials ).
- Attach Policy: On the user’s summary page, go to the Permissions tab. Click Add permissions, then Attach existing policies directly.
- Search and Attach: Search for the policy you just created (e.g.,
JenkinsEC2ManagementPolicy ), select it, and click Add permissions.
4.2.2. Attaching to an IAM Role (Recommended for Production)
If your Jenkins is running on an EC2 instance, it’s best practice to use an IAM role attached to the EC2 instance. Jenkins can then assume this role to get temporary credentials.
1. Navigate to Roles: In the IAM console, choose Roles from the left-hand navigation pane.
2. Create or Select Role: If you don’t have a role for your Jenkins EC2 instance, create a new one. Choose AWS service as the trusted entity and EC2 as the use case. If you have an existing role, select it.
3. Attach Policy: On the role’s summary page, click Add permissions, then Attach policies.
4. Search and Attach: Search for the policy you created (e.g., JenkinsEC2ManagementPolicy ), select it, and click Add permissions.
5. Attach Role to EC2 Instance: Ensure the EC2 instance running Jenkins has this IAM role attached as its instance profile. This is typically done during instance launch or can be modified later.
4.3. IAM Permission Assignment Flow
The process of assigning IAM permissions can be summarized as follows:
Conclusion
This detailed block provides a comprehensive guide to implementing and securing an AWS EC2 instance management pipeline using Jenkins. By understanding the pipeline’s stages, the specific AWS CLI commands executed, and the necessary IAM permissions, you can ensure that your automation is both powerful and secure. Adhering to the principle of least privilege and properly configuring IAM policies are crucial steps in maintaining a robust and secure cloud environment.