
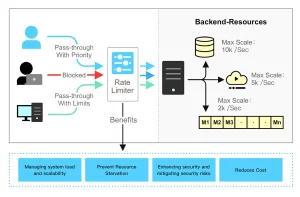
Hello, fellow developers! Rate limiting is something we all need to think about when building APIs or web services. By controlling how many requests a user can make in a certain period, rate limiting helps keep your service running smoothly and prevents abuse.
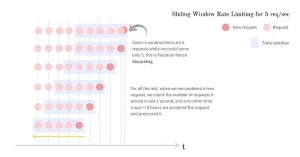
One of the coolest and most effective ways to handle rate limiting is through the sliding window approach. This method is a bit smarter and more flexible than some of the more basic techniques, offering a smoother experience for your users by making sure legitimate requests aren’t unfairly blocked.
Premise :
So, what’s the sliding window approach all about? Think of it as an upgrade to the fixed window or rolling window methods you might have heard of. While those methods work in fixed time chunks, the sliding window approach looks at requests on a more continuous basis, tracking each one with its timestamp. This way, it gives a more accurate picture of what’s happening and ensures that users aren’t penalized just because they made a request at the wrong time.
In this blog, we’ll dive into how the sliding window approach works, why it’s better than some other methods.
Components of the Rate limiter
The Rate limiter has the following components
Configuration Store — to keep all the rate limit configurations
Request Store — to keep all the requests made against one configuration key
Decision Engine — it uses data from the Configuration Store and Request Store and makes the decision
When implementing the sliding window approach for rate limiting, you’ll need to break down the logic into a few key components: the Configuration Store, Request Store, and Decision Engine.
Here’s a quick overview of each:
Configuration Store
The Configuration Store is where all your rate limit rules live. Think of it as the control center for your rate limiting logic. It stores configurations like how many requests are allowed, the time frame for these requests, and any specific conditions or exceptions. For example, you might have different rate limits for different types of users—like free vs. premium—or based on the type of API endpoint being accessed. By centralizing this information, the Configuration Store makes it easy to update and manage your rate limiting policies without diving deep into your code.
Request Store
The Request Store is like the memory of your rate limiting system. It keeps track of all the requests made by each user or API key within a given time frame. Every time a new request comes in, it’s logged in the Request Store with a timestamp. This log is what the sliding window approach uses to determine whether a user has exceeded their rate limit. By maintaining a record of recent requests, the Request Store enables precise tracking and ensures that decisions are based on the most up-to-date information.
Decision Engine
The Decision Engine is the brain of your rate limiting setup. It pulls data from both the Configuration Store and the Request Store to make real-time decisions about whether a request should be allowed or blocked. Here’s how it works: when a new request comes in, the Decision Engine checks the relevant configuration to understand the rate limits. Then, it looks at the Request Store to see how many requests have already been made in the current sliding window. Based on this information, it decides whether the request should pass through or if the user has hit their limit and needs to be blocked.
In summary, these three components—Configuration Store, Request Store, and Decision Engine—work together to create a flexible and effective rate limiting system using the sliding window approach. The Configuration Store sets the rules, the Request Store tracks the activity, and the Decision Engine makes the call on whether a request is within the allowed limits.