The theme defines the look and feel of your store. One for Magento default theme “Luma”. If you want to changes in existing theme then you have to create a child theme of the existing theme rather than implementing the changes in the parent theme.
Why should I make a child theme?
Because, if the changes are directly done in the parent theme, upgrading the Magento version or upgrading the theme results in loss of theme changes in the parent theme.
Steps to create Child Theme:
Vendor Name: InnovationM
Parent Theme name: luma
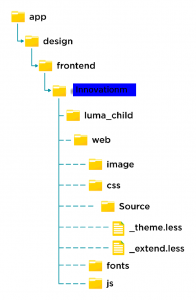
- Create a folder of child theme “luma_child’ in the below-mentioned folder path.
Magento root app/design/frontend/Innovationm/luma_child
- Create file theme.xml inside the child theme
<theme xmlns:xsi="http://www.w3.org/2001/XMLSchema-instance"

       xsi:noNamespaceSchemaLocation="urn:magento:framework:Config/etc/theme.xsd">

    <title>{Child Theme Name}</title>

    <parent>{parent-theme-vendor-name}/{parent-theme-name}</parent>

    <media>

        <preview_image>media/preview.png</preview_image>

    </media>

</theme>
Example:
<theme xmlns:xsi="http://www.w3.org/2001/XMLSchema-instance" xsi:noNamespaceSchemaLocation="urn:magento:framework:Config/etc/theme.xsd">

    <title>Luma Child</title>

    <parent>Magento/luma</parent>

    <media>

        <preview_image>media/preview.png</preview_image>

    </media>

</theme>
- Create a registration.php file for registering your child theme.
<?php

\Magento\Framework\Component\ComponentRegistrar::register(\Magento\Framework\Component\ComponentRegistrar::THEME,

    'frontend/{theme-vendor-name}/{parent-theme-name}_child',

    __DIR__

);
Example:
<?php

\Magento\Framework\Component\ComponentRegistrar::register(

    \Magento\Framework\Component\ComponentRegistrar::THEME,

    'frontend/Innovationm/luma_child',

    __DIR__

);
- Create composer.json
{

    "name": "{theme-vendor-name}/theme-frontend-{parent-theme-name}-child",

    "description": "N/A",

    "require": {

        "php": "~5.5.0|~5.6.0|~7.0.0|~7.1.0|~7.2.0|~7.3.0",

        "{parent-theme-vendor-name}/{parent-theme-name}": "100.0.*",

        "magento/framework": "100.0.*"

    },

    "type": "magento2-theme",

    "version": "100.0.1",

    "license": [

        "OSL-3.0",

        "AFL-3.0"

    ],

    "autoload": {

        "files": [

            "registration.php"

        ]

    }

}
Example:
{

    "name": "innovationm/luma_child",

    "description": "N/A",

    "require": {

        "php": "~5.5.0|~5.6.0|~7.0.0",

        "magento/luma": "100.0.*",

        "magento/framework": "100.0.*"

    },

    "type": "magento2-theme",

    "version": "2.2.1",

    "license": [

        "OSL-3.0",

        "AFL-3.0"

    ],

    "autoload": {

        "files": [

            "registration.php"

        ]

    }

}
- Create a web directory inside the child theme with the following empty directories and files. The whole directory

- Provide access/permission for child theme directories and files. Go to the child theme directory in the terminal and run this command to give permissions for the child theme directory: chmod -R 777 *.
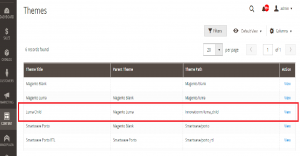
- The admin panel shows the created child theme.

Go to Admin -> Content ->Themes
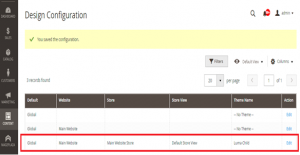
Go to Content > Design > Configuration.

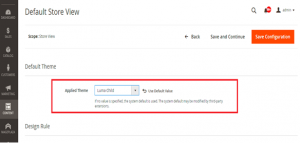
Select the child theme

Save
Run the commands
php bin/magento cache:clean

php bin/magento cache:flush
- The newly created child theme will also deploy in the pub/static folder.
Conclusion
Our Blog helps to change the appearance of the existing themes by creating a child theme. You can go now customize our child theme.
We hope this post is useful. HAPPY CODING 🙂
 End to End Technology Solutions
