Hello, folks.
In this post we are going to implement a reusable component for freehand drawing. We will see how to use `UIGestureRecognizer` for drawing and using linear polarization to make our drawing smooth. We will also create a method to draw an arrow with respect to two points.
So let’s start with creating a simple `UIView` subclass on which we will draw. Just create the class `LineHolderView` and add following code:
class LineHolderView: UIView {

    private var bezierPathLine: UIBezierPath!
    private var bufferImage: UIImage?

    override init(frame: CGRect) {

        super.init(frame: frame)
        initializeView()
    }

    required init?(coder aDecoder: NSCoder) {

        super.init(coder: aDecoder)
        initializeView()
    }

    override func draw(_ rect: CGRect) {
        bufferImage?.draw(in: rect)
        drawLine()
    }

    private func drawLine() {
        UIColor.red.setStroke()
        bezierPathLine.stroke()
    }

    private func initializeView() {

        isMultipleTouchEnabled = false

        bezierPathLine = UIBezierPath()
        bezierPathLine.lineWidth = 4

        self.backgroundColor = UIColor.clear

        let panGesture = UIPanGestureRecognizer(target: self, action: #selector(viewDragged(_:)))
        addGestureRecognizer(panGesture)

    }

    func viewDragged(_ sender: UIPanGestureRecognizer) {

        let point = sender.location(in: self)

        if point.x < 0 || point.x > frame.width || point.y < 0 || point.y > frame.height {
            return
        }

        switch sender.state {

        case .began:
            bezierPathLine.move(to: point)
            break

        case .changed:
            bezierPathLine.addLine(to: point)
            setNeedsDisplay()
            break

        case .ended:
            saveBufferImage()
            bezierPathLine.removeAllPoints()
            break
        default:
            break
        }
    }

    private func saveBufferImage() {
        UIGraphicsBeginImageContextWithOptions(self.bounds.size, false, UIScreen.main.scale)
        if bufferImage == nil {
            let fillPath = UIBezierPath(rect: self.bounds)
            UIColor.clear.setFill()
            fillPath.fill()
        }
        bufferImage?.draw(at: .zero)
        drawLine()
        bufferImage = UIGraphicsGetImageFromCurrentImageContext()
        UIGraphicsEndImageContext()
    }
}
What we did here, we created a subclass of `UIView` and in both initializers called a method `initializeView()`.
In `initializeView()` method we disabled the multiple touch, create an object of `UIBezierPath` class and added and `UIPanGestureRecognizer` at the view. Here you can change the thickness of drawing at line 32.
Now let’s see the implementation of method `viewDragged(_: )` which is the selector for `UIPanGestureRecognizer` and will be called when user drags on the view.
So in this first we get the current location of user’s finger in view and if the location if outside of the container then we ignore the drawing. Now the `state` property of `UIPanGestureRecognizer` tells us whether the drag is started, changed or ended. So we have Added a switch case on `state` property and did following of different states:
- Began: When user began the dragging we move our bezier path to that point.
- Changed: When drag changed we added an line to the current point.
- Ended: In this we used the method `saveBufferImage()` to convert the current drawing into an image and store it. It will save the cost of redrawing whole path next time.
In `draw(_:)` method we first draw the stored buffer image and then we set the stroke color for line color and stroke the bezier path. You can change the stroke color if you want to change the line color.
That’s it, set this `LineHolderView` as a class to any view in storyboard and done, start drawing.
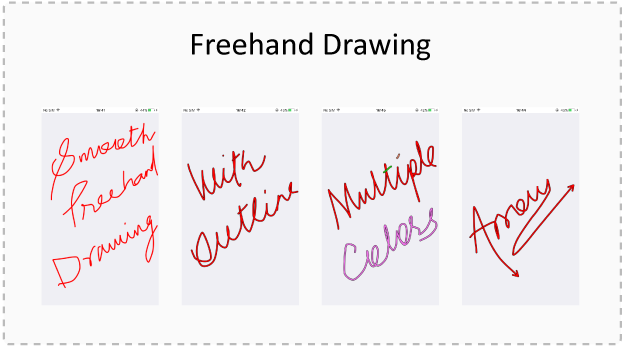
Here is the result:
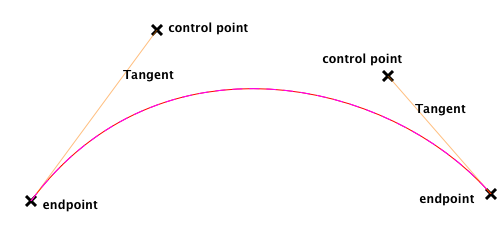
As you can see in the above image the lines have sharp changes in it. So here we a concept named ‘Linear Polarization’ to smoother our drawing. In Linear polarization we draw an arc with four points and two of them works as control points and the arc drawn below the tangent of first and second point and tangent of third and fourth points.
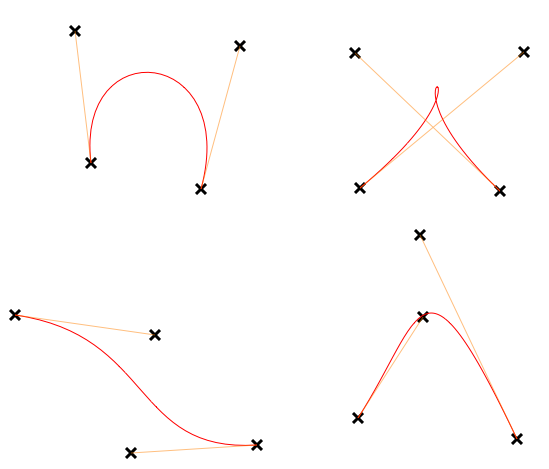
Here are some examples of arcs drawn with two control points:
So here we will use an array to store the 4 points, and when we get four points then we will draw an arc between them with two control points using the `UIBezierPath` method `addCurve(to endPoint: CGPoint, controlPoint1: CGPoint, controlPoint2: CGPoint)`.
Here is the complete code after changes:
class LineHolderView: UIView {

    private var bezierPathLine: UIBezierPath!
    private var bufferImage: UIImage?

    private var bezierCurvePoints: [CGPoint] = [] // Create an array to store points.

    override init(frame: CGRect) {

        super.init(frame: frame)
        initializeView()
    }

    required init?(coder aDecoder: NSCoder) {

        super.init(coder: aDecoder)
        initializeView()
    }

    override func draw(_ rect: CGRect) {
        bufferImage?.draw(in: rect)
        drawLine()
    }

    private func drawLine() {

        UIColor.red.setStroke()
        bezierPathLine.stroke()
    }

    private func initializeView() {

        isMultipleTouchEnabled = false

        bezierPathLine = UIBezierPath()
        bezierPathLine.lineWidth = 4

        self.backgroundColor = UIColor.clear

        let panGesture = UIPanGestureRecognizer(target: self, action: #selector(viewDragged(_:)))
        addGestureRecognizer(panGesture)

    }

    func viewDragged(_ sender: UIPanGestureRecognizer) {

        let point = sender.location(in: self)

        if point.x < 0 || point.x > frame.width || point.y < 0 || point.y > frame.height {
            return
        }

        switch sender.state {

        case .began:
            bezierCurvePoints.append(point) // Add first point in array.
            break

        case .changed:

            bezierCurvePoints.append(point)

            // If we get 4 points.
            if bezierCurvePoints.count == 4 {

                // Draw an arc from point 0 to 3 with point 1 and 2 as control points.
                bezierPathLine.move(to: bezierCurvePoints[0])
                bezierPathLine.addCurve(to: bezierCurvePoints[3], controlPoint1: bezierCurvePoints[1], controlPoint2: bezierCurvePoints[2])

                let point = bezierCurvePoints[3]

                bezierCurvePoints.removeAll()

                // Store end point of arc as a start point for next arc.
                bezierCurvePoints.append(point)
                setNeedsDisplay()
            }

            break

        case .ended:

            saveBufferImage()

            // Remove all points.
            bezierCurvePoints.removeAll()
            bezierPathLine.removeAllPoints()
            break
        default:
            break
        }
    }

    private func saveBufferImage() {
        UIGraphicsBeginImageContextWithOptions(self.bounds.size, false, UIScreen.main.scale)
        if bufferImage == nil {
            let fillPath = UIBezierPath(rect: self.bounds)
            UIColor.clear.setFill()
            fillPath.fill()
        }
        bufferImage?.draw(at: .zero)
        drawLine()
        bufferImage = UIGraphicsGetImageFromCurrentImageContext()
        UIGraphicsEndImageContext()
    }
}
Compile and Run it. You will get some output like this:
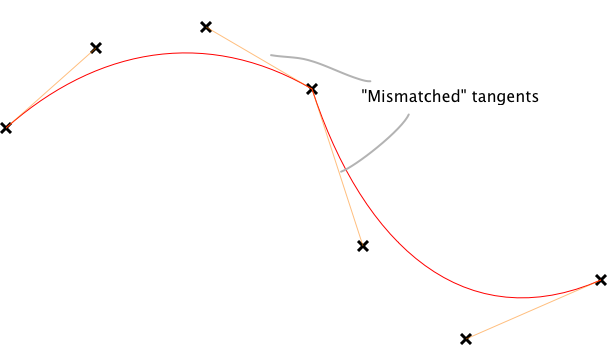
As you can see the drawing is improved but it have some problem when there is a mismatch in the tangents of last and starting point of the curve as shown in following picture.
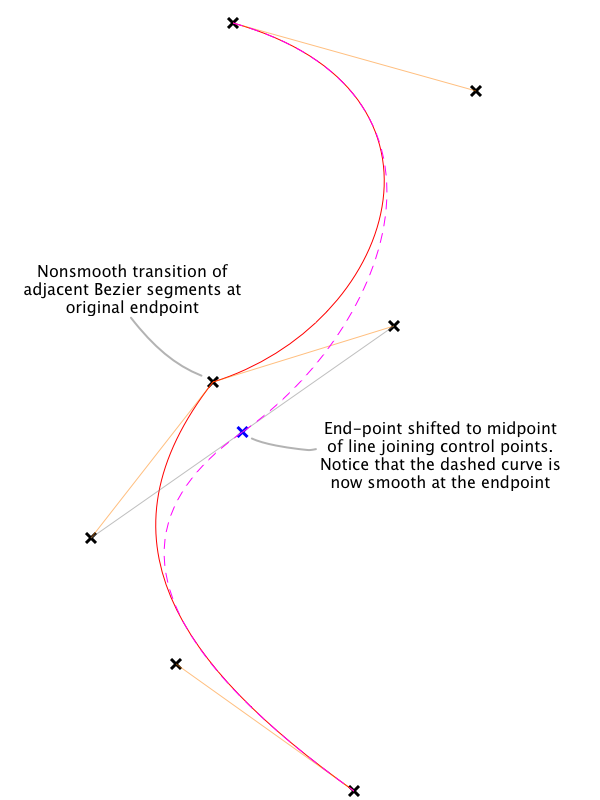
So now we have to match the tangents by calculating a new intersection point between two curves like following picture:
So we have to calculate a middle point of 3rd point of first curve and 1st point of second curve. So we will need an extra point to calculate the midpoint. Now the points array will have 5 points.
Change the class with following code and run.
class LineHolderView: UIView {

    private var bezierPathLine: UIBezierPath!
    private var bufferImage: UIImage?

    private var bezierCurvePoints: [CGPoint] = []

    override init(frame: CGRect) {

        super.init(frame: frame)
        initializeView()
    }

    required init?(coder aDecoder: NSCoder) {

        super.init(coder: aDecoder)
        initializeView()
    }

    override func draw(_ rect: CGRect) {
        bufferImage?.draw(in: rect)
        drawLine()
    }

    private func drawLine() {

        UIColor.red.setStroke()
        bezierPathLine.stroke()
    }

    private func initializeView() {

        isMultipleTouchEnabled = false

        bezierPathLine = UIBezierPath()
        bezierPathLine.lineWidth = 4

        self.backgroundColor = UIColor.clear

        let panGesture = UIPanGestureRecognizer(target: self, action: #selector(viewDragged(_:)))
        addGestureRecognizer(panGesture)

    }

    func viewDragged(_ sender: UIPanGestureRecognizer) {

        let point = sender.location(in: self)

        if point.x < 0 || point.x > frame.width || point.y < 0 || point.y > frame.height {
            return
        }

        switch sender.state {

        case .began:
            bezierCurvePoints.append(point)
            break

        case .changed:

            bezierCurvePoints.append(point)

            if bezierCurvePoints.count == 5 {


                // Calculate center point of 3rd and 5th point
                let x1 = bezierCurvePoints[2].x
                let y1 = bezierCurvePoints[2].y

                let x2 = bezierCurvePoints[4].x
                let y2 = bezierCurvePoints[4].y

                // Replace 4th point with the calculated center point
                bezierCurvePoints[3] = CGPoint(x: (x1 + x2) / 2, y: (y1 + y2) / 2)

                // Draw arc between 1st and 4th point
                bezierPathLine.move(to: bezierCurvePoints[0])
                bezierPathLine.addCurve(to: bezierCurvePoints[3], controlPoint1: bezierCurvePoints[1], controlPoint2: bezierCurvePoints[2])

                let point1 = bezierCurvePoints[3]
                let point2 = bezierCurvePoints[4]

                bezierCurvePoints.removeAll()

                // Last two points will be starting two points for next arc.
                bezierCurvePoints.append(point1)
                bezierCurvePoints.append(point2)

                setNeedsDisplay()
            }

            break

        case .ended:

            saveBufferImage()

            bezierCurvePoints.removeAll()
            bezierPathLine.removeAllPoints()
            break
        default:
            break
        }
    }

    private func saveBufferImage() {
        UIGraphicsBeginImageContextWithOptions(self.bounds.size, false, UIScreen.main.scale)
        if bufferImage == nil {
            let fillPath = UIBezierPath(rect: self.bounds)
            UIColor.clear.setFill()
            fillPath.fill()
        }
        bufferImage?.draw(at: .zero)
        drawLine()
        bufferImage = UIGraphicsGetImageFromCurrentImageContext()
        UIGraphicsEndImageContext()
    }
}
Compile and Run it. You will get some output like this:
Now we have a smooth drawing.
Create Arrow
Now, lets create an arrow head at the end of the line segment. for this we will use last two points to calculate three points to create an arrow.
To calculate these points we will use following steps.
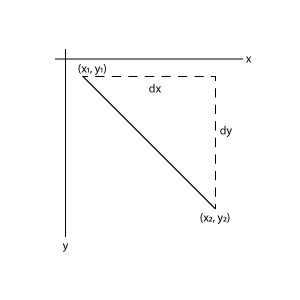
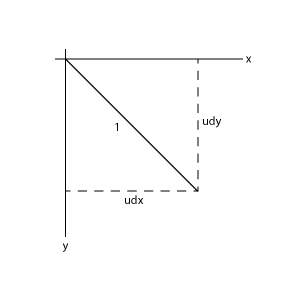
- First we will convert this line segment(made by last two points) into unit vector and translate this unit vector to origin.
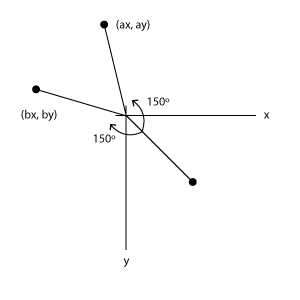
- Now rotate this point `(udx, udy)` by 150° clockwise and anti-clockwise.
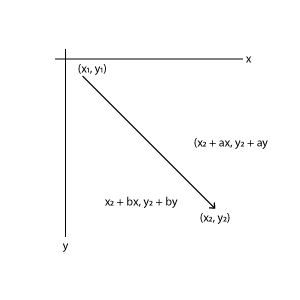
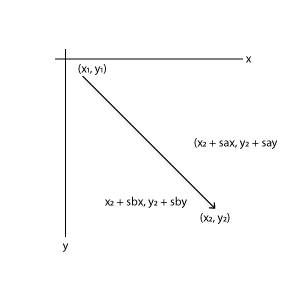
- Now we have two points `(ax, ay)` and `(bx, by)`. Lets translate these points to end of the line segment to get the points for our arrow.
- Till now this arrow if of unit length, to get a proper length scale these points with and scaling factor(s).
- Now combine these points `(ax0, ay0)`, `(x2, y2)` and `(bx0, by0)` to create a line segment for arrow.
The complete implementation of the algorithm is given below.
func getArrowHeadPoints() -> (point1: CGPoint, point2: CGPoint, point3: CGPoint)? {

    var points: (CGPoint, CGPoint, CGPoint)? = nil

    if bezierCurvePoints.count >= 2 {

        let start = bezierCurvePoints[bezierCurvePoints.count - 2]
        let end = bezierCurvePoints[bezierCurvePoints.count - 1]

        let dx = end.x - start.x
        let dy = end.y - start.y

        let normal = sqrt(dx*dx + dy*dy)

        // Convert into unit vectors
        var udx = dx / normal
        var udy = dy / normal

        if normal == 0 {
            udx = 0
            udy = 0
        }

        // Rotate 150 degree clockwise to get first point
        let ax = (udx * cos150) - (udy * sin150)
        let ay = (udx * sin150) + (udy * cos150)

        // Rotate 150 degree anticlockwise to get second point
        let bx = (udx * cos150) + (udy * sin150)
        let by = (-1 * udx * sin150) + (udy * cos150)

        // Scale 20 points and then translate to end point for both points
        let ax0 = end.x + 20 * ax
        let ay0 = end.y + 20 * ay

        let ax1 = end.x + 20 * bx
        let ay1 = end.y + 20 * by

        let point1 = CGPoint(x: ax0, y: ay0)
        let point2 = CGPoint(x: ax1, y: ay1)
        let point3 = CGPoint(x: end.x, y: end.y)

        points = (point1, point2, point3)
    }

    return points
}
Use this method to get three points and draw line with these three lines in your `draw(_:)` method.
Thanks for reading. Hope you like the post. 🙂
 End to End Technology Solutions
