What is the Problem?
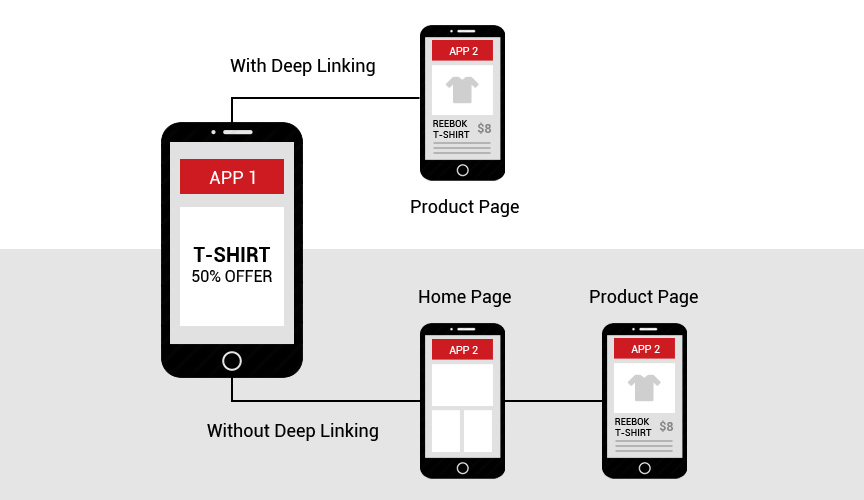
Guess if we have a mobile website as well as mobile App and an user share the url of any content on our website to a user who have our application installed on his/hers phone. If the user click on the link it will be opened in the web browser, but the same content is also available on the App and if it was opened on the App the user experience should have been better.
What deep link can do?
By using the deep link we can link the content inside of our application directly to the web url. So if an user sends a link to his/hers friends they can open the same content in the mobile application just by clicking the url.
Types of deep links
- Traditional Deep Link
- Deferred Deep Link
- Contextual Deep Link
Traditional Deep Linking
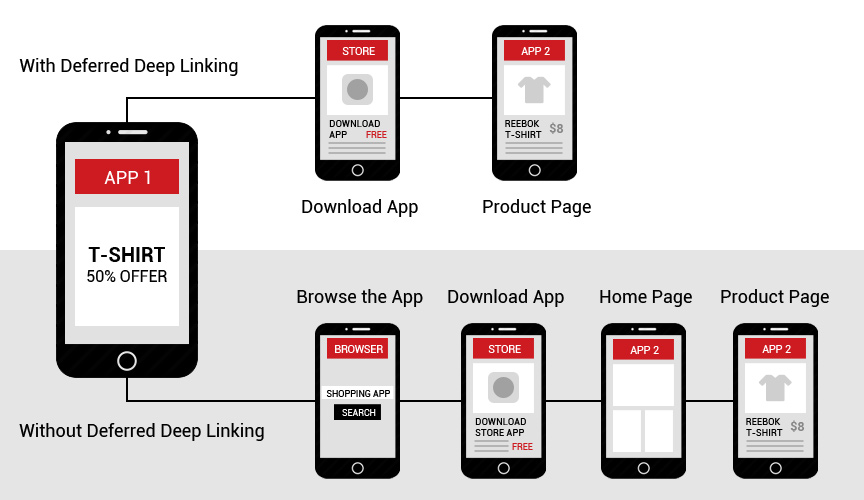
In traditional deep linking when an user click on any url it will redirect to the corresponding content in the application if the application is installed on the device otherwise it will open the url in web browser. In the case when user does not have application installed on his/hers device and open the link and from web browser it goes to store and installed the application then open it, he/she will land on the home page of the application rather than the content page of the url.
Deferred Deep Linking
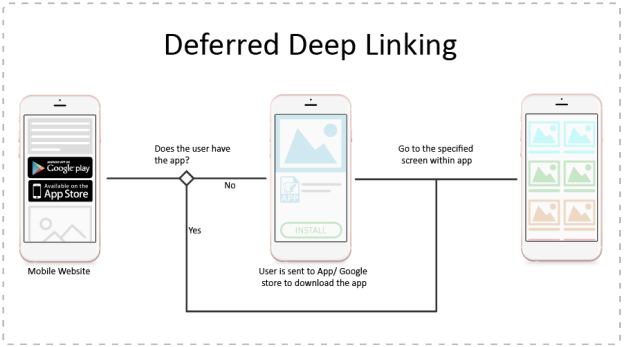
In Traditional deep linking we have a drawback of losing the link when user do not have App installed on his/hers device. In deferred deep linking we solve this problem and when user install the App for first time from a link and open the App we redirect him/her to the content according to the url.
Contextual Deep Linking
Contextual deep linking is much similar to Deferred deep linking. Addition to Deferred deep linking in Contextual deep linking we store user information and pass it to our mobile App so that we can restore his/hers state in mobile App. In this deep linking we not only pass data about where to land in the App but also record the information about the user including who they are, where they are referred from, who referred them or which promotion code they want to apply.
URL Scheme
URL Scheme let you define a custom protocol to let other application communicate with your application. To let other applications communicate with your App you must create an appropriately formatted URL and add support in your application. To implement URL Scheme you must tell the system to open it in your application and handle the incoming URL in your application. This URL Scheme looks like other URL Scheme like http://, ftp://, mailto://, tel:// etc. You can create your custom URL protocol like yourapp://open-home-page. Any application can open your application with this scheme by calling openURL. For Example if your custom URL is yourapp:// then following code will open your App:
let appUrl = URL(string: "youapp://page-to-open")
UIApplication.shared.openURL(appUrl!)
Register your Custom URL
To Register your application for URL Scheme support you have to include the CFBundleURLTypes key in your Info.plist file. This key will have array of dictionary with following keys:
- CFBundleURLName: It is a string containing abstract name of the URL Scheme.
- CFBundleURLSchemes: It is an array containing the URL Scheme names.
<key>CFBundleURLTypes</key>
<array>
  <dict>
   <key>CFBundleURLName</key>
   <string>com.yourapp</string>
   <key>CFBundleURLSchemes</key>
   <array>
    <string>yourapp</string>
   </array>
  </dict>
</array>
Handling the URL Request
When any application request your custom URL your App must handle the URL to open corresponding content. On any request to your custom URL will call AppDelegate’s method application(_:open:options:), so you have to implement this method in your AppDelegate. Refer following code snippet:
func application(_ app: UIApplication, open url: URL, options: [UIApplicationOpenURLOptionsKey : Any] = [:]) -> Bool {
  print(url)
  // Take decision according to URL
  return true
}
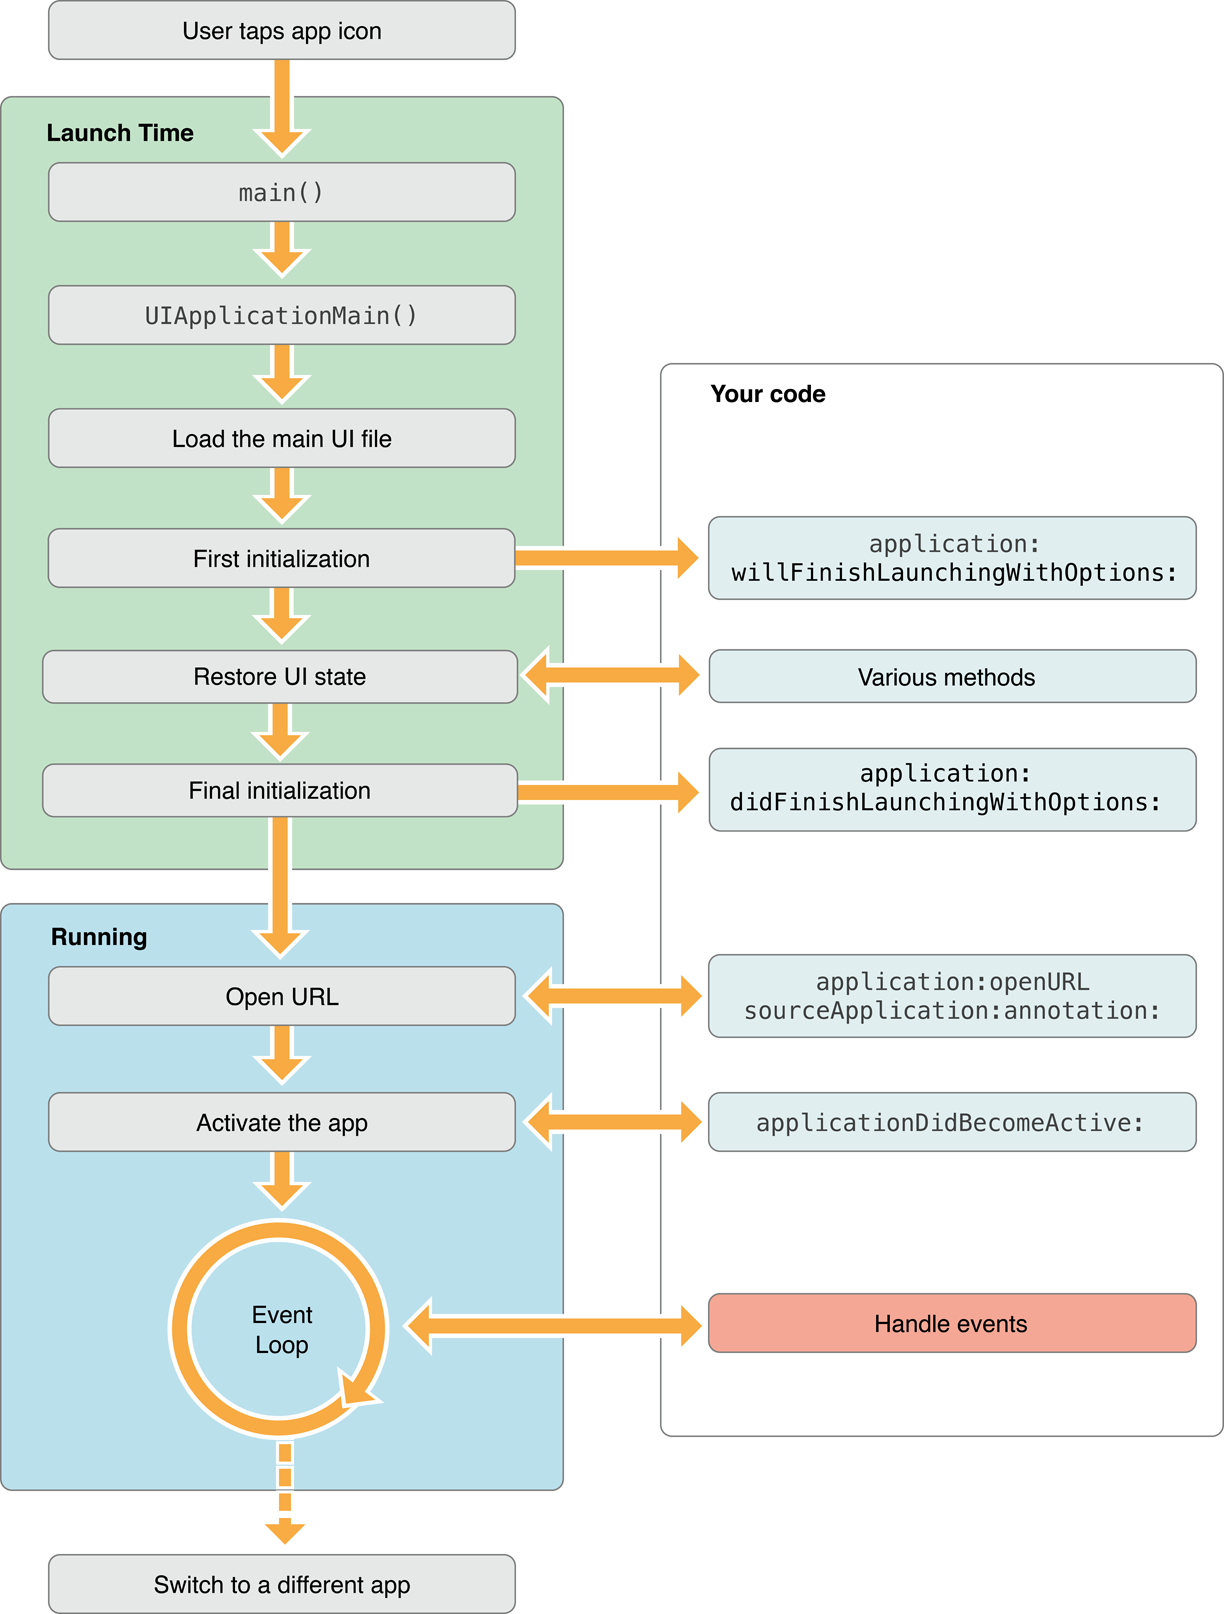
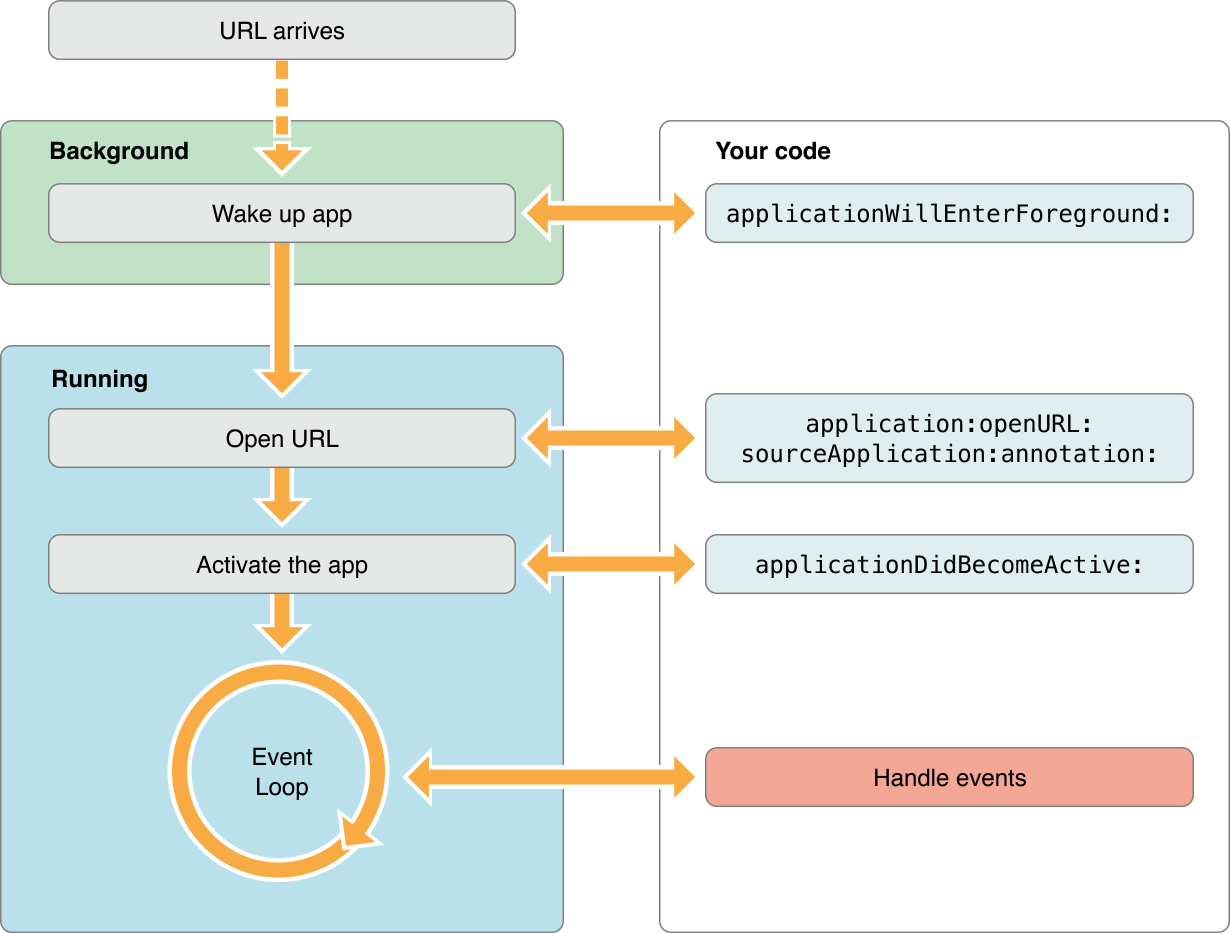
If your application is not running (Killed) then it will first launch your application and then call the open url method. In this case the following sequence of methods will be executed:
If your application is running but is in background or suspended state then following method sequence will be called:
Universal Link
The problem with URL Scheme is that when an user share a url the url is of a webpage which support http protocol and when an user click on it first the webpage will be open in web browser then in the web browser our web app has to make request to our custom url to open the content in the mobile app. So in Custom URL Scheme web browser has to be launched before we can open the content in our mobile App.
From iOS 9.0 Apple introduced Universal Link as a solution of this problem. Universal Link support direct linking between web page url and mobile app. When any user click on a url then iOS first check if there is any application which support this url if yes then it will open that corresponding Application otherwise the url will be opened in web browser.
To support Universal Link you have to follow these three steps:
- Create an apple-app-site-association file.
- Upload this file to your HTTPS server.
- Handle universal link in your App.
Create apple-app-site-association File
The apple-app-site-association file is used to create trust relationship between your mobile application and your server. This file contains simple json data (Do not add .json extension in file name) with following format:
{
  "applinks": {
   "apps": [],
   "details": [
    {
     "appID": "9JA89QQLNQ.com.apple.wwdc",
     "paths": [ "/wwdc/news/", "/videos/wwdc/2015/*"]
    },
    {
     "appID": "ABCD1234.com.apple.wwdc",
     "paths": [ "*" ]
    }
  ]
 }
}
In this json the apps key must be present and it’s value must be an empty array. The details key is an array of dictionaries. Each dictionary contains appId and paths keys. The value of key appId is your apple Id or team Id in the concatination of your bundle identifier. In Above example the first value of appId has 9JA89QQLNQ as apple Id and com.apple.wwdc as bundle identifier. You have to replace these values with your own apple Id and bundle identifiers. The value of key paths is an array of string that defines the parts of your website which your application can handle. In first dictionary it will open your application if url have /www/news/ in the url or it has any url starting with /video/wwdc/2015/.
Use * to link your whole website or use it after a path to support some part of your website.
You can also use NOT to exclude any url from universal link like: "paths": [ "/wwdc/news/", "NOT /videos/wwdc/2010/*", "/videos/wwdc/201?/*"].
Upload apple-app-site-association File to Server
To support Universal Link your server must support https protocol. Once you create the file you have copy this file to the root directory of your server or the .well-known subdirectory. This file should be accessible with https protocol without any redirection at https://<your_domain>/apple-app-site-association or https://<your_domain>/.well-known/apple-app-site-association
Handle Universal Link in your App
To handle universal link in your application first you have to add an entitlement file with supported urls in your application. To do so open Xcode, Select your project, Goto Capabilities and find Associated Domain section. Turn on this capability and add an entry for each domain your app supports with a prefix of applinks:
Now you have to implement application(_:continue:restorationHandler:) in your AppDelegate file. This method will be called when user click on link which your supports.
func application(_ application: UIApplication, continue userActivity: NSUserActivity, restorationHandler: @escaping ([Any]?) -> Void) -> Bool {
  let url = userActivity.webpageURL!
  print(url)
  // Take decision according to URL
  return true
}
Problem with Universal Link
In Universal link iOS also check the recent chioce of the user that whether to open the url in mobile application or web browser. When an user open the url in your application he/she can also open the url in Safari by tapping the breadcrumb button at the right side of the status bar.
Once user click on the breadcrumb button, iOS will remember the choice of the user and next time it will always open the link in Safari. To overcome this situation we have to add a Smart Banner to our web page so that when iOS open the application in Safari user can go back to application by Smart Banner. Once user open the Application using Smart Banner iOS will remember the choice of user and next time the link will be opened in Application.
Smart Banner
We can use smart banner in our webpage to let user install or open our mobile application directly from webpage. The banner intelligently changes it’s action depending upon whether the Application is installed on the device or not.
To add a Smart Banner to webpage use following meta tag:
<meta name="apple-itunes-app" content="app-id=myAppStoreID, affiliate-data=myAffiliateData, app-argument=myURL">
In this tag you have enter following parameters:
- app-id: It is you application’s unique identifier at App Store. You can find it Here. Search your app and the iPhone App Link. Your app ID is the nine-digit number in between
idand?mt. - affiliate-data: If you’re an iTunes affiliate you can add your affiliate string here. It is an Optional field.
- app-argument: Here you have to give the url that will be passed to your mobile App when user open the application by Smart Banner.
Here is the Smart Banner When App is not Installed:
When user click View he/she will be redirected to App Store.
Here is the Smart Banner When App is Installed:
When user click OPEN he/she will be redirected to your mobile app and next time when he/she click on link it will directly open in Mobile App.
Implementing Deferred Deep Linking
Unitl now we have two methods to open the application and getting the URL when application is installed on user’s device, But what if user click on link and the application is not installed on device. It will be opened on web browser, user will install the application but when he/she launches the application we will not get any url on which we can take decision to land him/her on the correct page. For this problem we have to implement some mechanism by which we can share the url between the web browser and the Mobile Application.
To share the data between Safari and Mobile App we will use SFSafariViewController. SFSafariViewController was introduced in iOS 9.0 and it supports sharing of web page data like cookies between applications. So what we are gonna do is to store the url in the cookie when user open the url in web browser and he/she lanunches the application we will open an simple page which will check the cookie and if cookie is present it will launch our application by using URL Scheme so that we can make a decision.
The complete flow of the application is shown in the following flow diagram:
Safari View Controller
Before reading the cookie using SFSafariViewController you have to first store the url (or token) in the cookie. So in the share url page you have to store the url (token) in the cookie of your web browser. Use following JavaScript Code to store the token in cookie:
custom = "yourapp://<your_token>";
var now = new Date();
var time = now.getTime();
var expireTime = time + 1000*3600;
now.setTime(expireTime);
document.cookie = 'yourKey=' + custom + ';expires='+now.toGMTString()+';domain=<your_domain>';
Now to read the cookie we have to launch the SFSafariViewController. Use following code to launch this controller:
let redirectUrl = URL(string: "http://<youwebsite>/redirect.html")!

let safariViewController = SFSafariViewController(url: redirectUrl)
safariViewController.delegate = self
safariViewController.modalPresentationStyle = .overCurrentContext
safariViewController.view.alpha = 0.05

present(safariViewController, animated: false, completion: nil)
You have to import SafariServices framework to use SFSafariViewController.
Now you have to implement the SFSafariViewControllerDelegate in your view controller. This delegate have two methods you have to implement and then dismiss the Safari View Controller.
extension ViewController: SFSafariViewControllerDelegate {

  func safariViewController(_ controller: SFSafariViewController, didCompleteInitialLoad didLoadSuccessfully: Bool) {
   controller.dismiss(animated: false, completion: nil)
  }

  func safariViewControllerDidFinish(_ controller: SFSafariViewController) {
   controller.dismiss(animated: false, completion: nil)
  }

}
Now in url we have used redirect.html which will be responsible reading the cookie and then calling our application by URL Scheme. Add following code in the redirect.html file to read and redirect.
<script>

  function getCookie(name) {
   var re = new RegExp(name + "=([^;]+)");
   var value = re.exec(document.cookie);
   return (value != null) ? unescape(value[1]) : null;
  }

  var m = getCookie("yourKey");

  if(m){
   location.href = m;
  } else {
   document.writeln("No Cookies...");
  }

</script>
That’s it. Hope you enjoyed reading it. 🙂
 End to End Technology Solutions
